6 Chapter 5: LIGHT SEARCH AND RESCUE OPERATIONS
In this chapter you will learn about:
- Search and Rescue Size up: How to size up the situation in which the search and rescue teams will operate.
- Conducting Interior and Exterior Search Operations: How to search systematically for disaster survivors.
- Conducting Rescue Operations: Safe techniques for lifting, leveraging, cribbing, and survivor removal.
6.1 Introduction and Chapter 5 Overview
Search and rescue consist of three separate operations:
- Size up involves assessing the situation and determining a safe action plan (using the 9-step size up model).
- Search involves locating survivors and documenting their location.
- Rescue involves the procedures and methods required to extricate the survivors.
Previous disasters have shown that the first response to trapped survivors immediately after almost every disaster is by spontaneous, untrained, and well-intentioned persons who rush to the site of a collapse in an attempt to free the survivors.
Often, these spontaneous rescue efforts result in serious injuries and compounded problems. Rescue efforts should be planned and practiced in advance. People, including rescuers, have died when the rescuers were not prepared and trained.
6.1.1 GOALS OF SEARCH AND RESCUE
The goals of search and rescue operations are to:
- Rescue the greatest number of people in the shortest amount of time
- Get the walking wounded and ambulatory survivors out first
- Rescue lightly trapped survivors next
- Keep the rescuers and survivors safe
This unit focuses on the components of an effective search and rescue operation — size up, search, and rescue — and the methods and techniques that rescuers can use to locate and safely remove survivors.
6.1.2 CHAPTER OBJECTIVES
At the end of this unit, you should be able to:
- Identify size up requirements for potential search and rescue situations.
- Describe the most common techniques for searching, both interior and exterior.
- Use safe techniques for debris removal and survivor extrication.
- Describe ways to protect rescuers during search and rescue operations.
6.1.3 CHAPTER TOPICS
This unit will provide you with the knowledge and skills that you will need:
- Safety During Search and Rescue Operations
- Conducting Interior and Exterior Searches
- Conducting Rescue Operations
6.2 Safety During Search and Rescue Operations
6.2.1 NERT SEARCH AND RESCUE SIZE UP
Like every other NERT operation, search and rescue requires size up at the beginning of the operation and continually as long as the operation continues.
Size Up Steps:
- Gather facts
- Assess damage
- Consider probabilities
- Assess your situation
- Establish priorities
- Make decisions
- Develop a plan of action
- Take action
- Evaluate progress
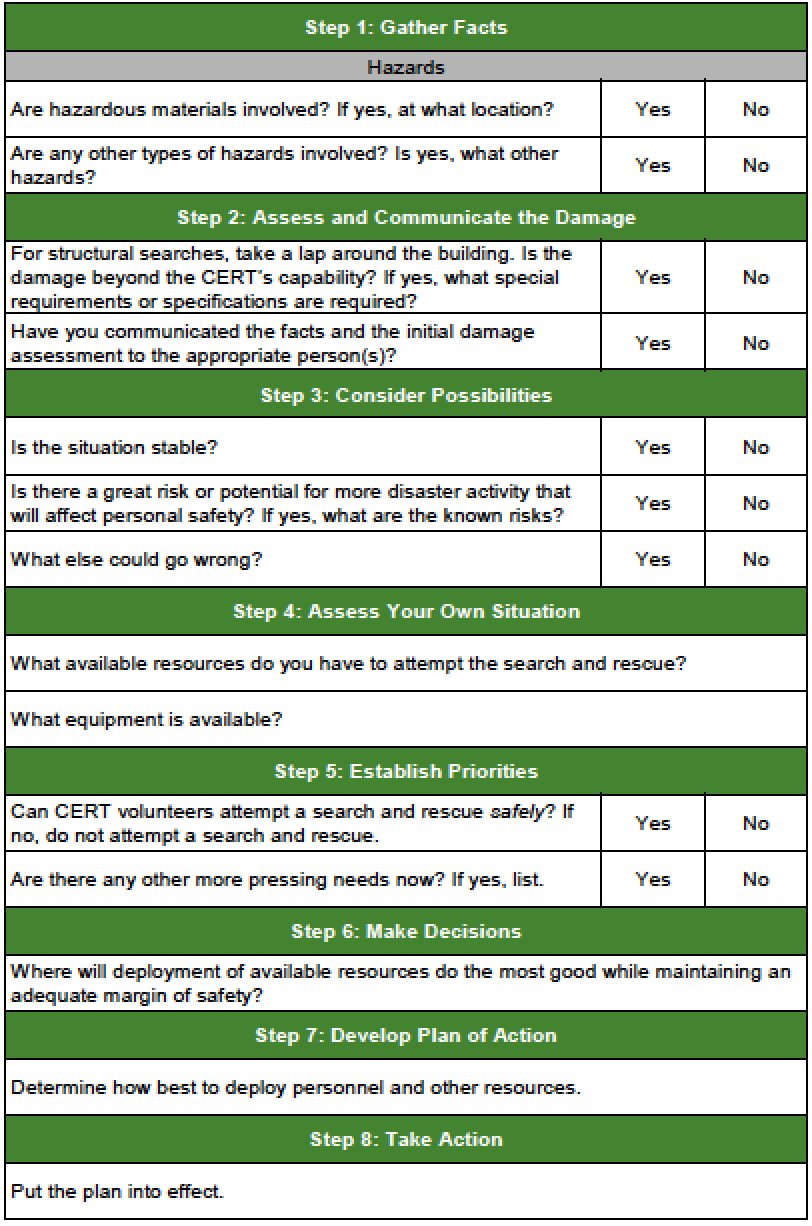
Step 1: Gather Facts
The facts of the situation must guide your search and rescue efforts. When gathering facts, NERT volunteer responders should consider:
- The time of the event and day of the week. At night, more people will be in their homes, so the greatest need for search and rescue will be in residential settings. Conversely, during the day, people will be at work, so the need will be in commercial buildings. Search and rescue operations may also be affected by where people are located in their homes and the amount of daylight available.
- Construction type and terrain. Some types of construction are more susceptible to damage than others. The type of terrain will affect how the search is conducted.
- Occupancy. The purpose for which the structure was designed may indicate the likely number of survivors and their location.
- Weather. Severe weather will have an effect on survivors and rescuers alike and will certainly hamper rescue efforts. Forecasts of severe weather should be considered as a limiting factor on the time period during which search and rescue can occur.
- Hazards. Knowledge of other potential hazards in the general and immediate areas is important to search and rescue efforts. For example, if a gas leak is suspected, taking the time to locate and shut off the gas can have a big impact in loss of life.
SAFETY DURING SEARCH AND RESCUE OPERATIONS (CONTINUED)
6.2.2 Step 2: Assess & Communicate Damage
There are general guidelines for assessing damage in interior searches and exterior searches. When in doubt about the condition of a building, NERT responders should always use the more cautious assessment. If unsure about whether a building is moderately or heavily damaged, assume heavy damage. The NERT mission changes depending on the amount of structural damage.
6.2.3 NERT MISSION AND TYPES OF DAMAGES
The NERT procedure for interior searches is to systematically locate, assist, and if appropriate, evacuate victims, but the procedure must take into account the severity of the damage:
Light Damage*** ***- superficial or cosmetic damage, superficial cracks or breaks in the wall surface, minor damage to the interior contents.
Triage each victim found, using Thirty-2-Can-Do and if necessary, check/clear airway, and stop major bleeding, treat for shock; then continue size up and document.
Moderate Damage - visible signs of damage, decorative work damaged or fallen, many visible cracks in the wall surface, major damage to interior content, building is on its foundation
Same procedure as with light damage, but minimizing the number of rescuers and time spent inside the structure.
Heavy Damage - partial or total collapse, tilting, obvious structural instability, building off its foundation, heavy smoke or fire, hazardous materials inside, gas leaks
Secure the building perimeter and warn others of the danger in entering the building.
NERT members are not to enter a building with heavy damage under any circumstances.
SAFETY DURING SEARCH AND RESCUE OPERATIONS (CONTINUED)
6.2.3.1 Assess Damage
Assess the damage of a building or structure requires an examination from all sides. Be sure to do an initial “lap around” the building.
In assessing damage, NERT responders must consider probable levels of damage based on the type and age of construction.
In addition to a visual assessment, rescuers should also “listen” to damaged structures. If a building is creaking or “groaning,” it is unstable and should not be entered.
6.2.3.2 Describe & Communicate Damage
Use the ABCD convention to precisely describe locations within and around the structure, where A denotes the front of the building, and B, C, and D represent the sides of the building moving clockwise from A (e.g., C is the back of the building).
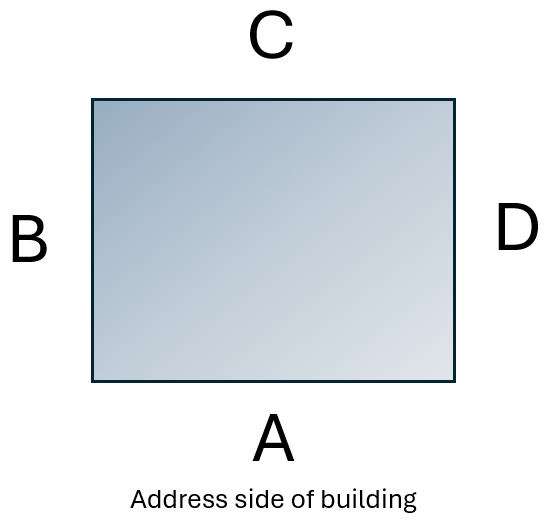
Using this system, the area inside of a structure can be further broken down by quadrants to facilitate communication. For instance, a hazard or survivor located closest to the A and B sides of the structure is in the A/B quadrant.
Field Teams: You must communicate your findings to the NERT neighborhood staging area.
| Probable Severity and Type of Earthquake Damage Based on Construction Type | |||
| Construction Type | Description | Probable Damage Areas | Severity |
| Single-Family Dwelling | Wood frame |
Masonry chimney Utilities |
Light |
| Pre-1933 |
Foundation movement Utilities Porches |
Moderate | |
| Hillside |
Unique hazards Ground failure |
Heavy | |
| Multi-Family Dwelling | Up-and-down and/or side-by-side living units |
Soft Story, first floor Utilities |
Moderate |
| Unreinforced Brick |
Pre-1933 construction. Lime or sand mortar. “King Row” or “Soldier Row” (bricks turned on end every 5-7 rows). Reinforcing plates. Arched windows and doors. Recessed windows and doors. |
Walls collapse, then roof | Heavy |
| Tilt-Up |
Large warehouses and plants Concrete slabs lifted into place. Walls inset approximately 6-8 inches. Lightweight roof construction. |
Roof collapses, then walls | Heavy |
| High-Rise | Steel reinforced |
Broken glass Content movement Exterior trim and fascia |
Light |
6.2.4 Step 3: Consider Possibilities
Because you will be working in close proximity to a dangerous situation, consider what will probably happen and what can happen. Be sure to identify potentially life-threatening hazards and ask:
How stable is the situation?
Even within a structure that appears from the outside to have only minimal or moderate damage, nonstructural damage or instability inside the structure can pose real danger to the rescue team. NERT responders should think about what they already know about the structure that’s been damaged. Are lawn chemicals, paints, or other potentially hazardous materials stored within the structure? How are they stored? Where are they? Answering such questions can make a huge difference in how to approach the search.
What else could go wrong?
Based on the information gathered during Steps 1 and 2 of the size-up, NERT responders should take a few moments to play “What if?” to try to identify additional risks that they may face. What if the electricity fails during the search? What if a wall that appears stable shifts and collapses?
What does it all mean for the search and rescue?
Based on the probabilities, NERTs should think about what they can do to reduce the risks associated with the probabilities that they have identified. Is a spotter necessary to look for movement that could indicate a possible collapse and warn the rescue team? Is some remedial action required to stabilize nonstructural hazards before beginning the search? Remember that YOUR safety is the first priority.
6.2.5 Step 4: Assess Your Situation
Remember that size-up is a process, with each step building upon the previous steps until the decision is made to begin the search and rescue operation (or that the situation is unsafe). You need to draw on everything you’ve learned from Steps 1 through 3 to assess your situation to determine:
- Whether the situation is safe enough to continue
- The risks that rescuers will face if they continue
- What resources will be needed to conduct the operation safely and what resources are available
Assessing resources, including personnel, tools, and equipment, is extremely important to search and rescue operations.
SAFETY DURING SEARCH AND RESCUE OPERATIONS (CONTINUED)
| Search and Rescue Resource Planning Questions | |
| Resource | Planning Questions |
| Personnel |
How many trained NERT members are available for this operation? Who lives and/or works in the area? During which hours are these people most likely to be available? What skills or hobbies do they have that might be useful in search and rescue operations? What might be the most effective means of mobilizing their efforts? |
| Equipment |
What equipment is available locally that might be useful for search and rescue? Where is it located? How can it be accessed? On which structures (or types of structures) might it be most effective? |
| Tools | What tools are available that might be useful for lifting, moving, or cutting disaster debris? |
Rescue Resources
6.2.6 Step 5: Establish Priorities
After evaluating the situation and keeping in mind that the safety of the NERT responder is always the top priority, the next step is to determine:
- What should be done?
- In what order?
Remember your goal: to safely assist or rescue the greatest number in the shortest amount of time. Think through the situation logically before acting.
6.2.7 Step 6: Make Decisions
At this point in the size up you will make decisions about where to deploy your resources to do the most good while maintaining an adequate margin of safety. Many of your decisions will be based on the priorities established during Step 5 based on:
- The safety of NERT members
- Life safety for survivors and others
- Protection of property
- Protection of the environment
6.2.8 Step 7: Develop Plan of Action
Step 7 is where all of the information you have about the situation comes together. During Step 7, the NERT Field Team Leader will decide specifically how the team will conduct its operation, considering the highest priority tasks first.
When search and rescue operations are required, the situation is probably complex enough that a written plan will be important. However, verbally describing the plan to the team may be sufficient in simpler situations.
A plan should:
- Help focus the operation on established priorities and decisions
- Provide for documentation to be given to responding agencies when they arrive on scene
- Provide for documentation that will become part of the record of the NERT’s overall operation
Keep notes as you develop your action plan. Any changes made to the initial plan based on new information that comes in should also be documented in the Field Team’s Unit Log.
6.2.9 Step 8: Take Action
This step involves putting the plan developed in Step 7 into action.
6.2.10 Step 9: Evaluate Progress
Step 9, Evaluate Progress, is the most critical step, not only in terms of evaluating whether the plan works, but also from a safety standpoint.
Remember that size up is ongoing and that information gained during Step 9 needs to be fed back into the decision-making process for possible revision of priorities and updated action planning.
SAFETY DURING SEARCH AND RESCUE OPERATIONS (CONTINUED)
6.2.11 Specific Safety Considerations
Regardless of the severity of structural damage, rescuer safety must be the primary concern.
The two most frequent causes of rescuer deaths are:
- Disorientation
- Secondary collapse
Follow these guidelines during all search and rescue operations:
- Use a buddy system: Before starting a rescue activity, pair up with another rescuer, stay close, and confirm that everyone is in agreement on entry and exit plans.
- Be alert for hazards: (e.g., power lines, natural gas leaks, hazardous materials, sharp objects, etc.). You should never attempt to search an area where water is rising.
- Use safety equipment: Wearing gloves and a helmet will protect a rescuer’s hands and head. Also, the primary cause of rescuer problems after working in a structural collapse is inhaling dust, so it is essential to wear a dust mask. However, a dust mask will not filter out all harmful materials. If the presence of chemical or biological agents is suspected, NERTs must evacuate to an upwind location and notify professional responders.
- Have backup teams available: Allow for a rotation of teams, prevent fatigue, and ensure help if a team gets into trouble. Have teams drink fluids and eat to keep themselves fresh.
6.3 Conducting Interior and Exterior Search Operations
When the decision is made to initiate search operations, NERT field team responders will inspect the area assigned by the NERT Incident Commander/Task Force Leader (IC/TL). NERT roles/assignments covered in class session 5.
The search operation involves two processes:
- Employing search techniques based on the size up
- Locating any survivors
By using these processes, search operations will be more efficient, thorough, and safe. They will also facilitate later rescue operations. Although the processes are related, this section addresses them one at a time. Interior search operations are the most common and will be discussed first; exterior search operations will be discussed later in this chapter.
6.3.1 Locating Potential Survivors in a Structure
The first step in locating potential survivors in a structure is to conduct a size up of the interior of the building to gather more precise information about damage and to develop priorities and plans.
The data gathered will provide information about areas of entrapment — or voids.
STRUCTURAL VOIDS
If NERT members see collapsed floors or walls, they should leave the premises immediately.
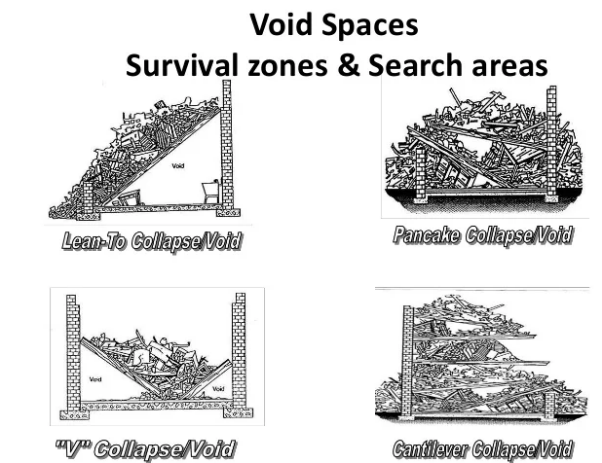
There are several types of voids:
- Pancake void
- Lean-to void
- “V” void
6.3.2 Individual Voids
Individual voids are spaces into which the survivor may have crawled for protection. Examples of individual voids include bathtubs and the space underneath desks. Children may seek shelter in smaller places like cabinets.
After identifying the possible areas of entrapment, NERT responders must:
- Determine the potential number of survivors
- Identify the most probable areas of entrapment
Some information may be known through assessment, information can be gained by talking to bystanders or those who are familiar with the structure.
CONDUCTING INTERIOR AND EXTERIOR SEARCH OPERATIONS (CONTINUED)
Ask questions when talking with these individuals, including:
- How many people live (or work) in the building?
- Where would they be at this time?
- What is the building layout?
- What have you seen or heard?
- Has anyone come out?
- What are the normal exit routes from the building?
Be aware that bystanders may be confused by the event. They may tend to exaggerate potential numbers or may not even remember the event accurately. Gather as much information as you can, though, because it will be useful for planning search priorities and implementing the search.
6.3.3 Search Methodology
An effective search methodology:
- Indicates rescuer location
- Locates survivors as quickly and safely as possible
- Prevents duplication of effort
6.3.3.1 Search Markings
Experienced search and rescue personnel use the following system. The same system will be used by NERTs. This will save fellow NERT responders and other responders time during the search and continual size up of the structure.
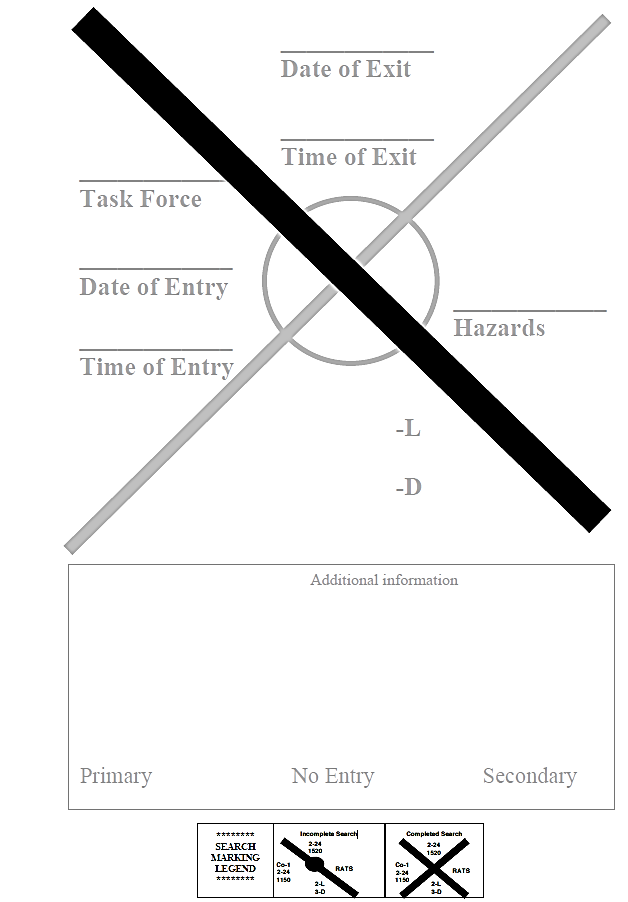
- Upon entering a search area, you will make a mark next to the door to indicate that you are entering. Do not make the mark on the door or on the wall where the door might cover it. Make a single slash and write the agency group ID, date and “time in” at the “9 o’clock” position.
- Upon exiting the search area, make another slash to form an “X” (the agency or group ID will be in the left quadrant). Enter the search “time out” In the top quadrant.
- Right quadrant: Enter the areas of the structure searched and any specific information about hazards.
- Lower quadrant: Enter information about the victims found in the search area. “L” represents living survivors, while “D” represents dead victims. The search marking on the front of a structure or building should contain the total number of victims, whereas search markings inside the structure or building will include victim totals for specific search areas. Also indicate where victims and survivors have been taken.
Template of Search MarkingsTemplate of Search Markings
CONDUCTING INTERIOR AND EXTERIOR SEARCH OPERATIONS (CONTINUED)
Search Methodology (continued)
- Upon entering each space or room, call out to survivors. Shout something like, “Rescue Team. If anyone can hear my voice, come here.” If any survivors come to you, ask them for any information that they may have about the building or others who may be trapped, then give them further directions such as, “Stay here” or “Wait outside” (depending on the condition of the building).
Remember that even those who are able to get to you may be in shock and confused. When giving directions to survivors, look directly at the survivors, speak in short sentences, and keep their directions simple.
- Use a systematic search pattern. Ensure that all areas of the building are covered.
Examples of systematic search patterns to use include:
- Bottom-up/top-down
- Right wall/left wall
Keep in mind that every interior space has six sides — including the floor and ceiling. Rescuers must check all six sides, especially to locate hazards such as fixtures that may be hanging from the ceiling.
- Stop frequently to listen. Listen for tapping, movement, or voices.
- Triangulate. Triangulation can be used when a potential survivor’s location is obscured. If access permits, three rescuers, guided by survivor sounds, form a triangle around the area and direct flashlights into the area. The light shining from different directions will eliminate shadows that could otherwise hide survivors. Triangulation should not be used as an initial search method.
- Report results. Keep complete records both of removed victims and survivors and of survivors who remain trapped or victims who are dead. Report this information to emergency services personnel when they reach the scene.
6.3.4 Exterior Search
In addition to searching inside a structure, NERT responders might also be required to search open areas outside of buildings.
Conducting an effective search in open areas requires that searchers work methodically and follow standard procedures established by those in charge of the search operation. This is true in all cases, and especially if the area to be searched is a crime scene where all potential evidence must be protected.
CONDUCTING INTERIOR AND EXTERIOR SEARCH OPERATIONS (CONTINUED)
When searchers are needed, they assemble in a central staging area and sign in. Authorities will brief the searchers on what they will be looking for, what areas they are responsible for searching, the pattern of the search, and what they should do if they discover the missing person, evidence, or related information.
Exterior search patterns include grid, line, quadrant or zone, and spiral. A grid pattern is typically used in large open areas. To conduct a grid search:
- The area to be searched is viewed as a grid, with searchers initially positioned at one side of the grid.
- The distance between the searchers should be set according to visibility and debris. In all cases, searchers must remain within line of sight and voice contact with searchers on either side of them.
- It is also critical that the area to be covered by each searcher overlaps that of the searchers on either side of them.
- The searchers proceed, maintaining as straight a line as possible across the entire search area. As each searcher moves across the area, they conduct a thorough search for survivors within their designated row of the grid.
- To ensure full coverage, NERTs must record each area that has been searched.
A grid search might be particularly useful following a tornado or hurricane.
6.4 Conducting Rescue Operations
Rescues involve three primary functions:
- Move objects and debris to free survivors and to create a safe rescue environment
- Triage survivors to treat for the “three killers,” airway obstruction, major bleeding, and shock.
- Remove survivors as safely and as quickly as possible
6.4.1 Create A Safe Environment
There are three safety considerations for all rescue operations:
- Maintain rescuer safety
- Triage only in lightly and moderately damaged buildings
- Evacuate survivors as quickly as possible from moderately damaged buildings while minimizing additional injury
None of these can be achieved without creating as safe an environment as possible before attempting rescue. There are, therefore, certain precautions that rescuers must take to minimize risk.
CONDUCTING RESCUE OPERATIONS (CONTINUED)
6.4.2 Precautions To Minimize Risk
There are certain precautions that rescuers must take to minimize risk and increase their chances of achieving their rescue goals.
Know your limitations. Many volunteers have been injured or killed during rescue operations because they did not pay attention to their own physical and mental limitations. NERT responders should take the time to eat, drink fluids, rest, and relax so that they can return with a clear mind and improved energy.
Follow safety procedures. Always use the proper safety equipment required for the situation and follow established procedures, including:
- Work in pairs.
- Triage and treat only in lightly and moderately damaged buildings.
- In moderately damaged buildings, triage only and remove survivors as quickly as possible.
- Never enter an unstable structure.
- Lift by bending the knees, keeping the back straight, and pushing up with the legs.
- Carry the load close to the body.
- Lift and carry no more than is reasonable.
- Remove debris as needed to minimize risk to rescuers and free trapped survivors.
6.4.3 Proper Body Position for Lifting
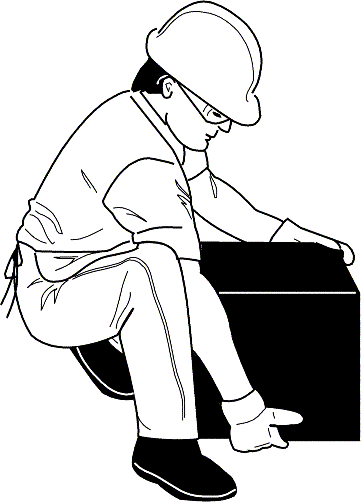
Proper body position for lifting showing the back straight and lifting with the knees
CONDUCTING RESCUE OPERATIONS (CONTINUED)
6.4.4 Leveraging And Cribbing
You may encounter situations in which debris needs to be moved to free survivors. In these situations, NERT responders should consider leveraging and cribbing to move and stabilize the debris until the rescue is complete.
- Leveraging is accomplished by wedging a lever under the object that needs to be moved, with a stationary object underneath it to act as a fulcrum. When the lever is forced down over the fulcrum, the far end of the lever will lift the object.
- A crib is a wooden framework used for support or strengthening. Box cribbing means arranging pairs of wood pieces alternately to form a stable rectangle.
Leveraging and cribbing are used together by alternately lifting the object and placing cribbing materials underneath the lifted edge to stabilize it.
Safety is number one: “Lift an inch; crib an inch.” Leveraging and cribbing should be gradual — both for stability and to make the job easier.
It may also be necessary to use leveraging and cribbing at more than one location (e.g., front and back) to ensure stability. Leveraging and cribbing at opposite ends should never be done at the same time because doing so will increase the instability of the debris. If leveraging is required at both ends, lift and crib at one end, then repeat the process at the other end.
Positioning the pry tool and the fulcrum correctly is critical for safe operations. The fulcrum and pry tool must be perpendicular (90 degrees) to the edge of the object being lifted. Also, attempting to leverage a heavy object using too sharp an angle is inefficient and can result in back injury.
Box cribbing is stable, but it requires pieces of cribbing material of relatively uniform size. When such material is not available, “unboxed” cribbing can also work effectively to support and stabilize the heavy object.
A variety of cribbing materials may be used for these procedures, and you will probably need to improvise by using materials such as tires or structural debris. Whatever you use, don’t put form over function.
When you are able to achieve sufficient lift, you should remove the survivor and reverse the leveraging and cribbing procedure to lower the object. You should never leave an unsafe condition, unless the structure or building is obviously compromised.
When you must remove debris to locate survivors, you should set up a human chain and pass the debris from one person to the next. Be careful, however, to set up the chain in a position that will not interfere with rescue operations.
Wear your PPE to protect yourself at all times. Kneepads can be an important addition to your PPE during rescue operations.
CONDUCTING RESCUE OPERATIONS (CONTINUED)
6.4.5 Leveraging and Cribbing (continued)
STEP 1. Conduct a size up of the scene: Gather facts, identify hazards, and establish priorities.
STEP 2. Have one person in charge and formulate a plan of action, based upon the information you have received, to identify how and where to lift and crib and how the survivor will be removed from underneath the debris.
STEP 3. Gather necessary materials for lifting/cribbing operations: Lever, fulcrum, cribbing blocks, spacers/wedges. During an actual emergency, you may have to use creative, substitute materials.
STEP 4. Use cribbing materials to stabilize the object prior to lifting.
STEP 5. Distribute cribbing materials as necessary to be readily accessible during the lifting operation.
STEP 6. Prepare to lift the object: Assemble the lever and fulcrum at the previously identified location.
STEP 7. Assign a person to monitor and be ready to remove the survivor as soon as possible.
STEP 8. Initiate the lift, using the lever and fulcrum for mechanical advantage.
STEP 9. As the object is lifted, add cribbing as needed, one layer at a time.
STEP 10. When the object is adequately supported, remove the lever and fulcrum. The survivor may then be removed.
STEP 11. Unless the structure is obviously compromised and you need to evacuate immediately, reinitiate the lift and begin removing cribbing materials, reversing the process by which the crib was built.
STEP 12. Progressively lower the object to the ground. Always return the heavy object to a stable position unless you must evacuate immediately.
STEP 13. Before you leave, remember to collect the lifting/cribbing supplies to be available for additional operations.

Medical Care / Victim Removal Person
Crib Person
Wall Collapse
Crib Person
Lever Person
Group Leader
6.4.6 Team organization for leveraging/cribbing operation, showing the survivor underneath a collapsed wall and the NERT members at the following locations:
Group Leader:
In front of collapse, positioned so that he or she can view the entire operation while remaining out of the rescuers’ way.
Lever Person:
At the front edge of the collapsed wall and positioned so that he or she can position a fulcrum and lever under the wall.
Crib Persons:
On either side of the collapsed wall and positioned to enable the placement of cribbing as the wall is raised with the lever.
Medical Care/Survivor Removal Person:
Next to the Crib Person who is closest to the survivor’s head.
Step 1Step 2
Step 3Step 4
Four steps for building box cribbing:
Step 1: Position two pieces of wood parallel to each other on either side of the collapse.
Step 2: Place two pieces of wood perpendicularly across the base pieces.
Steps 3 and 4: Add additional layers of wood, each perpendicular to the previous level.
6.4.7 Removing Survivors
There are two basic types of survivor removal:
- Self-removal or assist
- Lifts and drags
It is usually best to allow an ambulatory survivor to extricate him- or herself. Be aware that sometimes ambulatory survivors are not as strong and uninjured as they think they are. When survivors become free from entrapment, they may need assistance to exit the structure.
CONDUCTING RESCUE OPERATIONS (CONTINUED)
6.4.8 Extrication Method
The type of extrication method selected should depend on the:
- General stability of the immediate environment
- Number of rescuers available
- Strength and ability of the rescuers
- Condition of the survivor
If safety and time permit, you should not use lifts and drags to remove survivors when closed-head or spinal injury is suspected. In such cases, the spine must be stabilized using a backboard. Doors, tables, and similar materials can be used as improvised backboards. The backboard must be able to carry the person and proper lifting techniques must be used.
When moving survivors, rescuers must use teamwork and communication and keep the survivor’s spine in a straight line. Remember, rescuer safety and the condition of the building will dictate the approach.
Considerations Before a Patient Carry
Assess the Situation:
Before attempting a carry, evaluate the environment, the victim’s condition (conscious, unconscious, injured), rescuers’ abilities, the urgency of the situation, and the distance to be travelled.
Choose the Appropriate Carry:
Select a technique that is safe, effective, and suitable for the situation.
Maintain Proper Form:
Ensure the rescuer’s back is straight, legs are doing the work, and the victim is supported properly.
Communicate:
Ensure the whole team knows the procedure.
If possible, communicate with the victim to reassure them and guide them.
Priority is Safety:
The rescuer’s safety is paramount. Avoid putting yourself at risk by attempting a carry you are not comfortable with or if the environment is too dangerous.
6.4.9 Types of Lifts and Carries
There are many different Lifts and Carries.
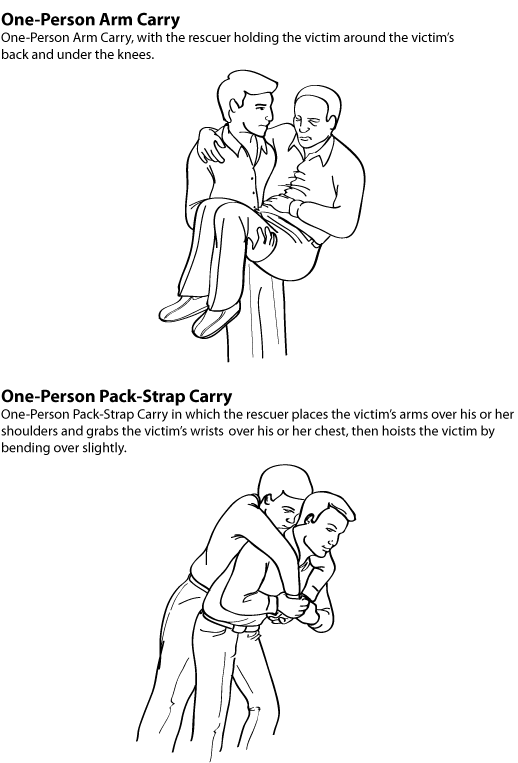
6.4.10 One-Person Arm Carry
If a rescuer is physically able and the survivor is small, the rescuer may use the one-person arm carry to lift and carry the survivor by:
- Reaching around the survivor’s back and under the knees
- Lifting the survivor while keeping the rescuer’s back straight and lifting with the legs Consider the size of the survivor and the distance he or she needs to be carried before using this carry.
6.4.11 Pack-Strap Carry
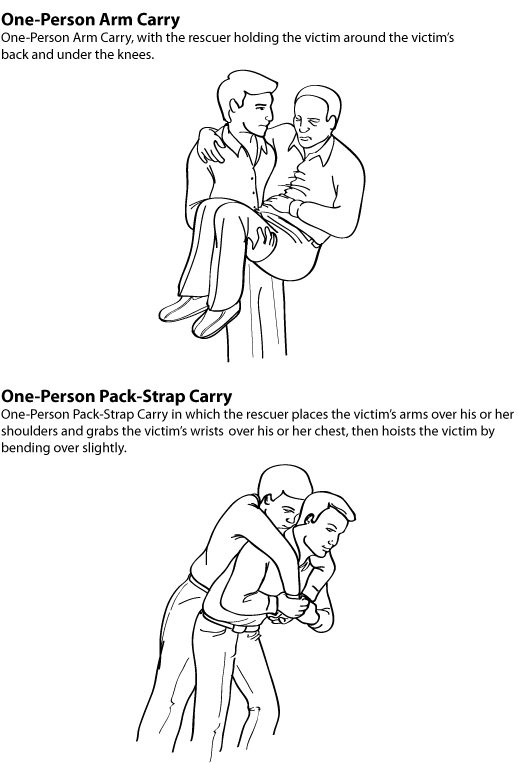
Another way for a single rescuer to lift a survivor safely is by using the one-person pack-strap carry. Using this method, the rescuer should:
Step 1: Stand with his or her back to the survivor.
Step 2: Place the survivor’s arms over the rescuer’s shoulders and grab the hands in front of the rescuer’s chest.
Step 3: Hoist the survivor by bending forward slightly, until the survivor’s feet just clear the floor.
Note: The pack-strap carry is most effective for quick removal of a survivor over a short distance.
CONDUCTING RESCUE OPERATIONS (CONTINUED)
6.4.12 Two-Person Carry
Survivor removal is easier when multiple rescuers are available. The survivor’s upper body will weigh more than his or her lower body; therefore, rescuers with greater body strength should be positioned at the survivor’s upper body.
A survivor may be removed using a two-person carry:
Rescuer 1: Squat at the survivor’s head and grasp the survivor from behind around the midsection. Reach under the arms and grasp the survivor’s left wrist with rescuer’s right hand, and vice versa. Crossing the wrists creates a more secure hold on the survivor and pulls the survivor’s arms and elbows closer to their body. This will be helpful if the survivor is carried through any narrow passages.
Rescuer 2: Squat between the survivor’s knees, facing either toward or away from the survivor. Note that, if the rescuers will carry the survivor over uneven areas such as stairs, the rescuers will need to face each other. Grasp the outside of the survivor’s legs at the knees. Both rescuers: Rise to a standing position while keeping backs straight and lifting with the legs. Walk the survivor to safety.
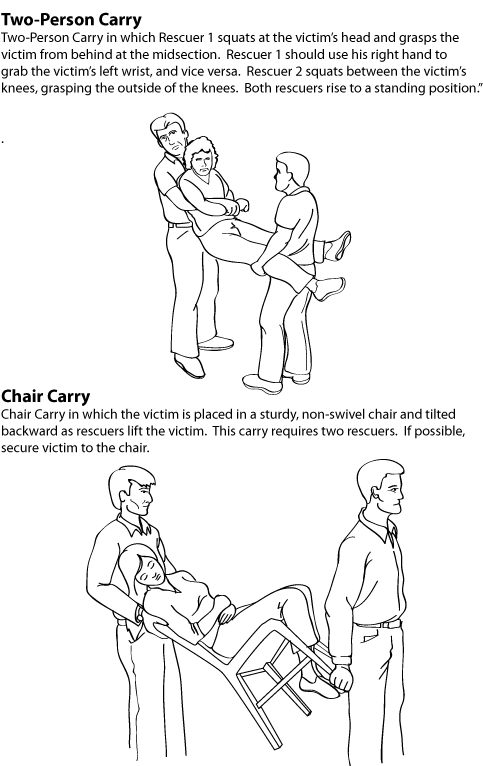
Note that if rescuers will need to carry a survivor over uneven surfaces, such as stairs, the rescuers must face each other.
6.4.13 Chair Carry
Two rescuers can also remove a survivor by seating him or her on a chair:
Rescuer 1: Cross the survivor’s arms in his or her lap. Facing the back of the chair, grasp the back upright.
Rescuer 2: Grasp the two front legs of the chair.
Both rescuers: Tilt chair back, lift simultaneously, and walk out. Use a sturdy chair.
Note that, if rescuers need to carry the survivor over uneven surfaces such as stairs, the rescuers must face each other.
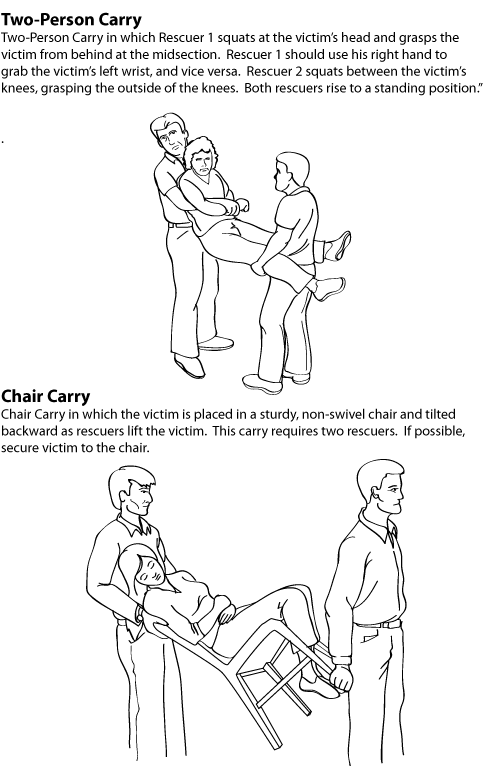
Note that if rescuers will need to carry a survivor over uneven surfaces, such as stairs, the rescuers must face each other.
6.4.14 Log Rolling
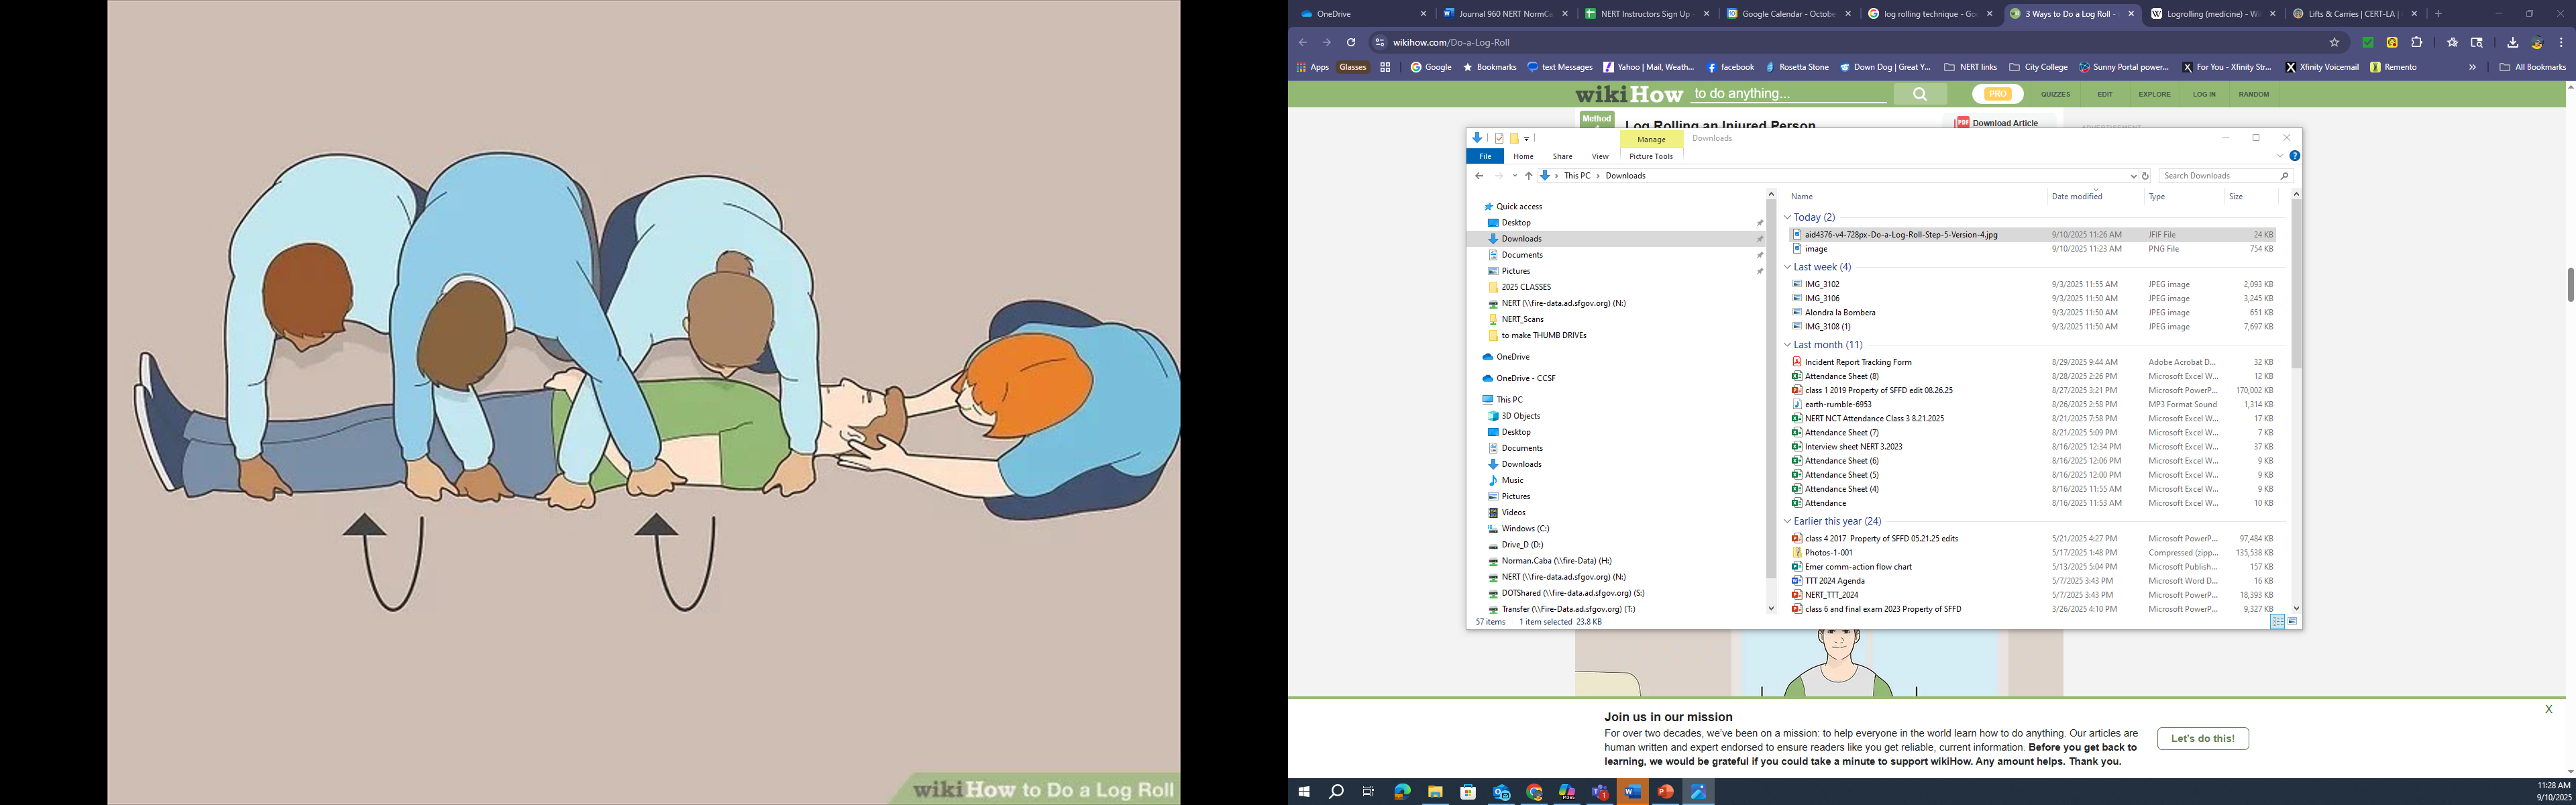
Log rolling should be used to move survivors with a suspected or confirmed cervical spine injury. If the survivor is unconscious, assume he or she has a cervical spine injury. The rescuer at a survivor’s head should give commands as fellow rescuers SLOWLY roll the survivor as a single unit onto the blanket, backboard, or other support.
6.4.15 Blanket Carry
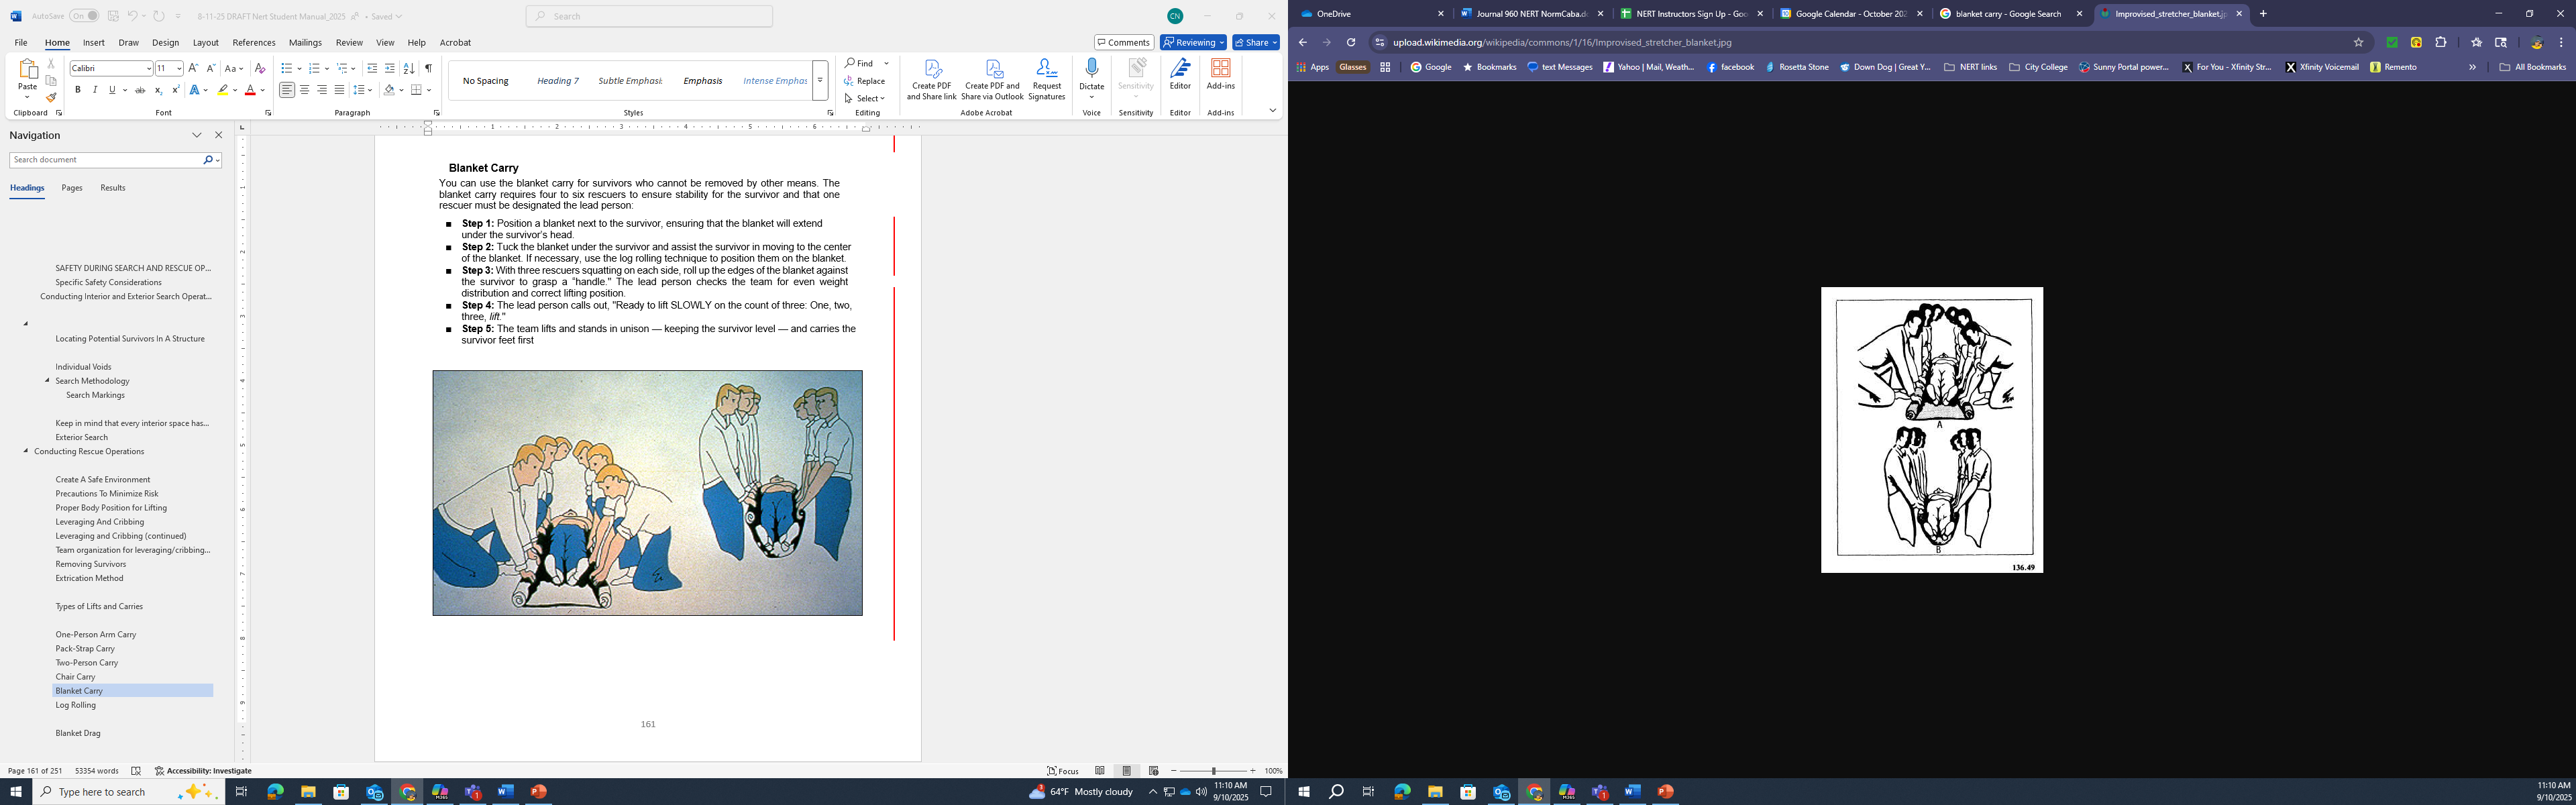
You can use the blanket carry for survivors who cannot be removed by other means. The blanket carry requires four to six rescuers to ensure stability for the survivor and that one rescuer must be designated the lead person:
Step 1: Position a blanket next to the survivor, ensuring that the blanket will extend under the survivor’s head.
Step 2: Tuck the blanket under the survivor and assist the survivor in moving to the center of the blanket. If necessary, use the log rolling technique to position them on the blanket.
Step 3: With three rescuers squatting on each side, roll up the edges of the blanket against the survivor to grasp a “handle.” The lead person checks the team for even weight distribution and correct lifting position.
Step 4: The lead person calls out, “Ready to lift SLOWLY on the count of three: One, two, three, lift.”
Step 5: The team lifts and stands in unison — keeping the survivor level — and carries the survivor feet first
To lower the survivor together, using the following steps:
Step 1: The lead person calls out, “Ready to lower SLOWLY on the count of three: One, two, three, lower.”
Step 2: The team lowers the survivor in unison, exercising caution to keep the survivor level.
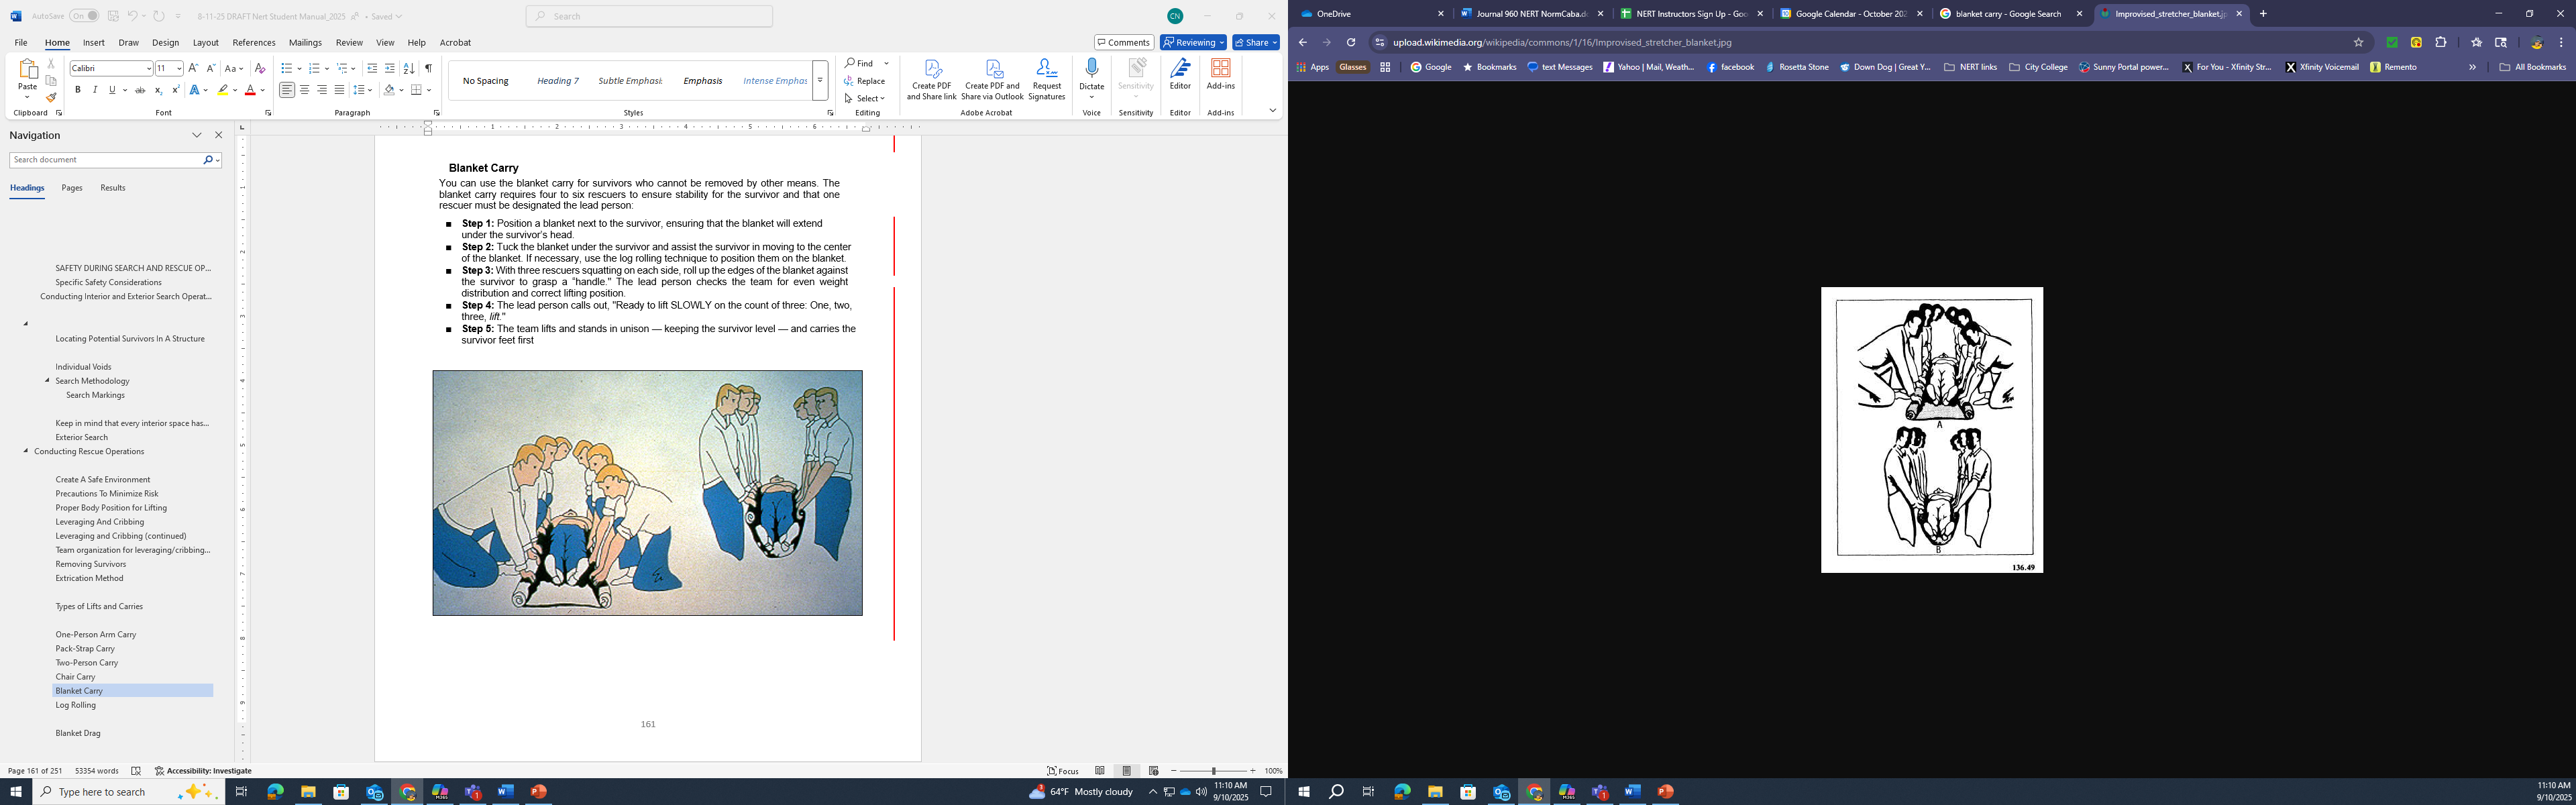
A variety of materials — such as blankets, carpets, and folded tables — can be used as improvised stretchers.
CONDUCTING RESCUE OPERATIONS (CONTINUED)
6.4.16 Blanket Drag
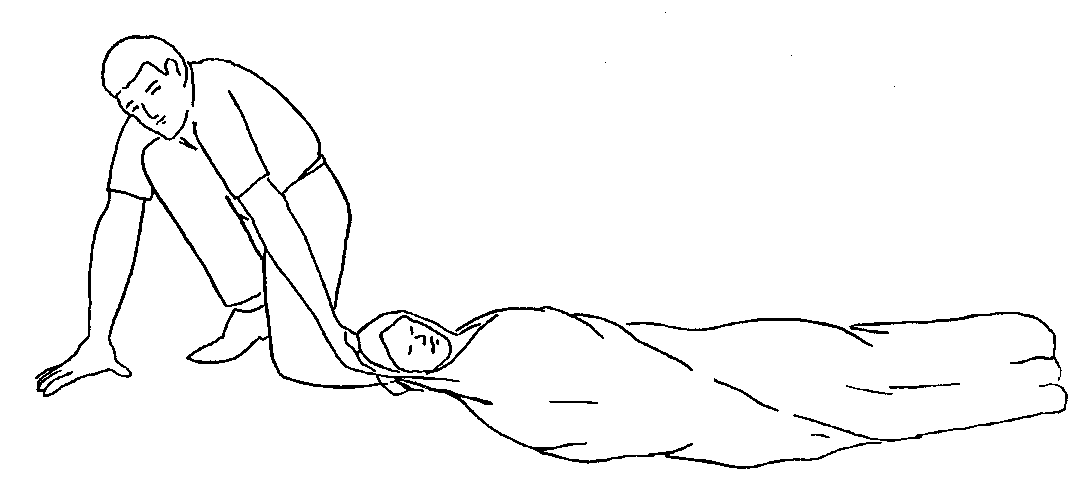
Blanket Drag
Blanket drag, showing the survivor wrapped in a blanket with the rescuer squatting at the survivor’s head. The rescuer grasps the blanket behind the head and drags him or her clear of the hazard. Note that this drag will have more friction on surfaces such as carpet or rough cement.
When necessary, one rescuer can use the blanket drag by following these steps:
Step 1: Wrap the survivor in a blanket.
Step 2: Squat down and grasp an edge of the blanket.
Step 3: Drag the survivor across the floor.
Other Drag Techniques

CONDUCTING RESCUE OPERATIONS (CONTINUED)
EXERCISE: SURVIVOR CARRIESPurpose: This exercise will provide you with an opportunity to practice different drags and carries to safely move survivors.Instructions:Break into teams of seven.Members of your team will volunteer to be “survivors” that other team members will move using the drags and carries demonstrated in the class.Use chairs and other items as needed to perform the drags and carries.Be sure to trade off “survivor” and “rescuer” roles so that everyone on your team has a chance to practice the drags and carries.Remember to know your limits! Do not attempt any lift or carry that will not be safe for you and the survivor.EXERCISE: SURVIVOR CARRIESPurpose: This exercise will provide you with an opportunity to practice different drags and carries to safely move survivors.Instructions:Break into teams of seven.Members of your team will volunteer to be “survivors” that other team members will move using the drags and carries demonstrated in the class.Use chairs and other items as needed to perform the drags and carries.Be sure to trade off “survivor” and “rescuer” roles so that everyone on your team has a chance to practice the drags and carries.Remember to know your limits! Do not attempt any lift or carry that will not be safe for you and the survivor.
EXERCISE: SURVIVOR EXTRICATION (Class 6 Exercise)Purpose: This exercise will provide you with an opportunity to practice the removal of entrapped survivors from a damage site, using leveraging/cribbing and drags and carries.Instructions:Break into teams of seven.Your team will be directed to a “damage site.” Consider your plan of action.Enter the “damage site” and conduct a room search. Locate survivors and make a plan for extricating them from the debris.Use leveraging and cribbing procedures as needed to free the survivor.Use appropriate lifts and drags to remove survivors from the room (and, if possible, from the building).If there is a second “damage site,” conduct another rescue operation.EXERCISE: SURVIVOR EXTRICATION (Class 6 Exercise)Purpose: This exercise will provide you with an opportunity to practice the removal of entrapped survivors from a damage site, using leveraging/cribbing and drags and carries.Instructions:Break into teams of seven.Your team will be directed to a “damage site.” Consider your plan of action.Enter the “damage site” and conduct a room search. Locate survivors and make a plan for extricating them from the debris.Use leveraging and cribbing procedures as needed to free the survivor.Use appropriate lifts and drags to remove survivors from the room (and, if possible, from the building).If there is a second “damage site,” conduct another rescue operation.
Chapter 5 Summary
The key points in this chapter:
The decision to attempt a rescue should be based on:
- The risks involved
- Achievement of doing the greatest good for the greatest number
The objectives of interior and exterior search and rescue are to:
- Always maintain rescuer safety
- Rescue the greatest number of people in the shortest amount of time
- Get the walking wounded and ambulatory survivors out first
- Rescue the lightly trapped survivors next
NERTs are restricted to light search and rescue. Your mission when dealing with heavily damaged structures or situations that are clearly unsafe is to warn others.
Search and rescue size up follow the same process as size up for other NERT operations. Size up continues throughout search and rescue efforts and provides information about how to proceed. Should size up indicate that evacuation of the team is necessary, ensure safety and organization during the evacuation.
When the decision to begin search operations is made, NERT searchers must:
- Employ appropriate search techniques
- Locate any survivors and treat the “three killers”
To locate survivors, complete a size up of the building then conduct a search that:
- Is systematic and thorough
- Avoids unnecessary duplication of effort
- Documents results
Rescue involves three main functions:
- Moving objects and debris to create a safe rescue environment and to free survivors
- Triaging survivors by checking for the “three killers” (airway obstruction, major bleeding, and shock)
- Removing survivors as safely and as quickly as possible
CHAPTER 5 SUMMARY (CONTINUED)
6.4.17 Remember that rescuer safety is always the top priority.
Rescue operations hinge on maintaining rescuer safety, which requires NERT responders to recognize their own limitations. Never attempt anything that exceeds YOUR limitations at that point in time.
Leveraging and cribbing may be used to lift heavy debris and give access to trapped survivors.
Survivors can be removed in a few ways, depending on:
- Their condition
- The number of rescuers available
- The strength and ability of the rescuers
- The stability of the environment
If the building’s condition allows, survivors with suspected head or spinal injury should be stabilized on some type of backboard before being removed. When possible, these removals should be deferred to trained EMS personnel.
HOMEWORK ASSIGNMENT
Read and become familiar with Chapter 6: NERT Organization and Chapter 7: Disaster Psychology that will be covered in Class 5.