4 CHAPTER 3: DISASTER MEDICAL OPERATIONS — PART 1
In this chapter you will learn about:
- Life-Threatening Conditions: How to recognize and safely treat an airway obstruction, bleeding, and shock, starting with wearing proper personal protective equipment (PPE) Gloves, Eye Protection, Pants, Boots.
- Triage: Principles of triage and how to conduct triage evaluations.
4.1 CHAPTER 3 INTRODUCTION & OVERVIEW
The need for NERTs to learn disaster medical operations is based on two assumptions:
- The number of survivors could exceed the local capacity for treatment.
- Survivors will attempt to assist others. As NERT responder you will need to know lifesaving first aid or post-disaster survival techniques.
NERT medical operations can play a vital role in limiting deaths from trauma. The phases of death from trauma are:
Phase 1: Death within minutes as a result of overwhelming and irreversible damage to vital organs
Phase 2: Death within several hours as a result of excessive bleeding
Phase 3: Death in several days or weeks as a result of infection or multiple-organ failure (i.e., complications from an injury)
These phases underline why disaster medical operations are conducted as they are (by identifying those with the most serious injuries as soon as possible and treating those with life-threatening injuries first). Some disaster victims in the second and third phases of death could be saved by providing simple medical care.
In a disaster there may be more survivors than rescuers, and assistance from medical professionals may not be immediately available. NERT responders are trained to be part of disaster medical operations and to provide:
- Treatment for life-threatening conditions — airway obstruction, bleeding, and shock
— and for other, less urgent conditions
- The greatest good for the greatest number of people by conducting simple triage and rapid treatment
4.1.0.1 START Triage is the system responders use to quickly categorize and prioritize adult patients in mass casualty incidents (MCIs), where there are more injured people than available medical resources. START is an acronym for Simple Triage and Rapid Treatment. It implies that patients can be triaged quickly while also receiving basic rapid treatment.
*Note that a similar system is used for pediatric patients called Jump Start Triage. The algorithm can be found in the appendix.
All NERT participants are encouraged to take basic first aid and CPR training; however, if you have taken first aid courses you will need to understand that NERT covers disaster medical operations where time is critical to conduct triage and treat many survivors. CPR is not taught in this course because it is labor intensive and not appropriate in austere conditions when there are many survivors and professional help will be delayed.
4.1.0.2 CHAPTER 3 OBJECTIVES
At the end of this unit, you should be able to:
- Identify the “killers.”
- Apply techniques for opening the airway, controlling bleeding, and treating shock.
- Conduct triage under simulated disaster conditions.
Remember, the goal of disaster medical operations is to do the greatest good for the greatest number. In a disaster with many survivors, time will be critical. NERT responders will need to work quickly and efficiently to help as many people as possible.
Chapter 3 Topics
This session will introduce you to the principles of triage, including treating the “three killers”: airway obstruction, excessive bleeding, and shock.
Throughout the unit, you will have opportunities to practice the treatment techniques, and at the end of the unit, you will have the opportunity to conduct simulated triage evaluations.
4.2 Treating Life-Threatening Conditions
In emergency medicine, airway obstruction, bleeding, and shock are “killers” because without treatment they will lead to death. The first priority of medical operations is to attend to those potential killers by:
- Opening the airway
- Controlling excessive bleeding
- Treating for shock
This section will train you to recognize the “killers” by recognizing their symptoms and their effects on the body.
Approaching the Survivor
Rescuers must first ensure that they are wearing safety equipment (PPE):
- Helmet
- Goggles
- Gloves
- N95 mask
- Sturdy shoes or boots
- Non-latex exam gloves
A good time-saving technique is to wear non-latex exam gloves under your work gloves. Then, when you find a survivor, you can remove your work gloves and are ready to work with the survivor.
Remember to use non-latex exam gloves to prevent potential reaction by individuals who are allergic to latex.
There are several steps to take when approaching a survivor. When ready to approach a survivor:
- If the survivor is conscious, be sure they can see you.
- Identify yourself by giving your name and indicating the organization with which you are affiliated.
- ALWAYS request permission to treat an individual. If the individual is unconscious, he or she is assumed to have given “implied consent,” and you may treat him or her. Ask a parent or guardian for permission to treat a child, if possible.
- Whenever possible, respect cultural differences. For example, in some Muslim traditions it is customary to address the male when requesting permission to treat a female member of his family.
- Remember, all medical patients are legally entitled to confidentiality (HIPAA). When dealing with survivors, always be mindful and respectful of the privacy of their medical condition.
4.2.0.1 Opening the Airway
The respiratory system includes the following components:
- Nasal Cavity
- Pharynx
- Larynx
- Trachea
- Bronchus
- Lung
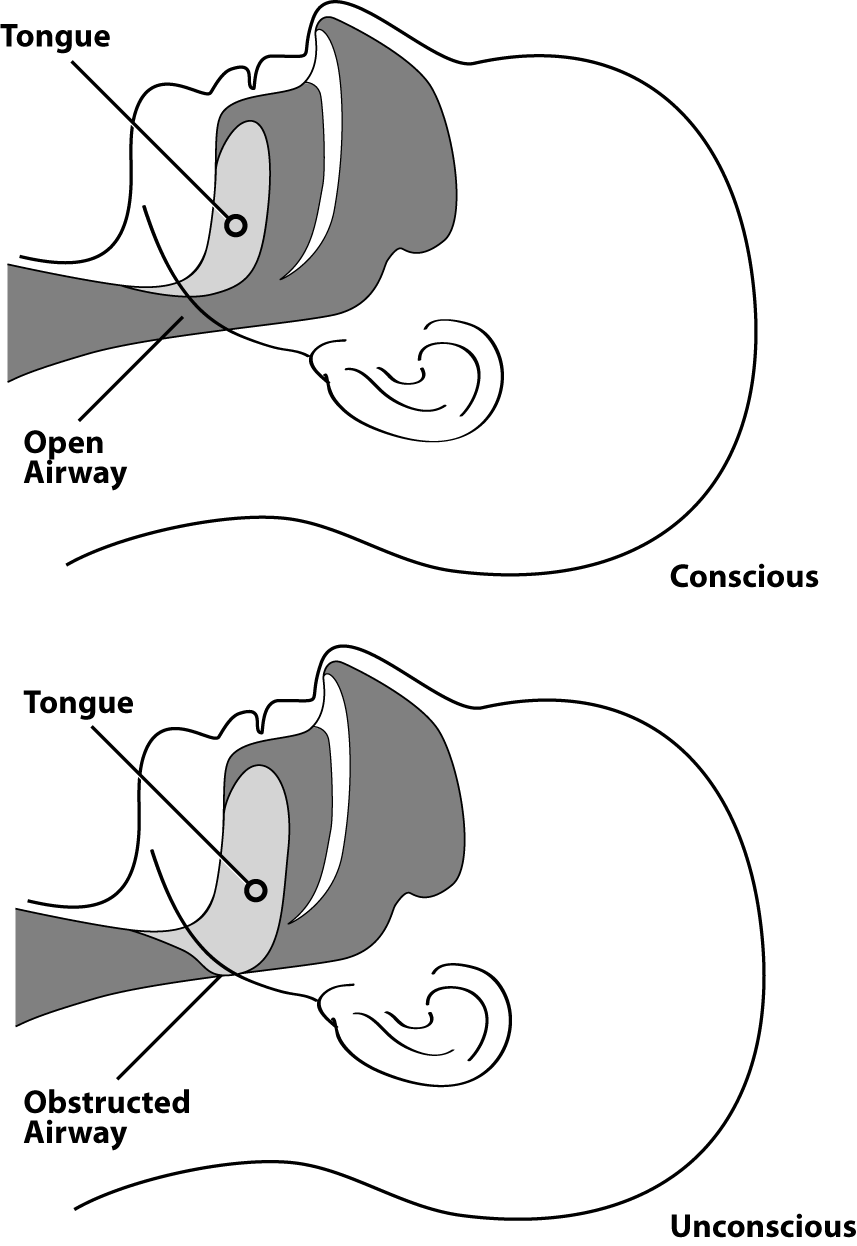
In an unconscious or semiconscious survivor, especially one positioned on his or her back, the most common airway obstruction is the tongue. The tongue — which is a muscle — may relax and block the airway. A survivor with a suspected airway obstruction must be checked immediately for breathing and, if necessary, the airway must be opened.
4.2.0.2 Airway Obstructed by the Tongue
TREATING LIFE-THREATENING CONDITIONS (CONTINUED)
4.2.0.3 The Head-Tilt/Chin-Lift Method* *
When an airway obstruction is suspected because a survivor is unconscious and not breathing, NERT responders should open the airway using the Head-Tilt/Chin-Lift method.
When a cervical spine injury is suspected, the preferred method to open an airway is the Jaw-Thrust Maneuver. During “Auster Care” situations when there are not enough resources to leave a rescuer with the patient, the Head-Tilt/Chin-Lift method may be used.
Proper technique is always important in opening an airway, but so is speed.
4.2.1 Head-Tilt/Chin-Lift Method for Opening an Airway
| Step | Action |
|---|---|
| 1 | Determine whether a patient is unconscious and not breathing by giving them a verbal and physical stimulus (shake and shout) and checking for signs of breathing. |
| 2 | If the survivor does not respond, begin to open the airway by placing your palm on the patient’s forehead. |
| 3 | Place two fingers of your other hand under the boney part of the chin and tilt the jaw upward while tilting the head back slightly. |
| 4 | Place your ear close to the survivor’s mouth, looking toward the survivor’s feet, and place a hand on the survivor’s abdomen. |
| 5 | LOOK for chest rise or abdominal movement. |
| 6 | LISTEN for air exchange. Document abnormal lung sounds (wheezing, gasping, gurgling, etc.). |
| 7 | FEEL for abdominal movement or air on your cheek. |
| 8 | If breathing has been restored, the clear airway must be maintained by keeping the head tilted back. If breathing has not been restored, repeat steps 2-7. |
TREATING LIFE-THREATENING CONDITIONS (CONTINUED)
EXERCISE: OPENING THE AIRWAYPurpose: Practice using the Head-Tilt/Chin-Lift method to open the airway. EXERCISE: OPENING THE AIRWAYPurpose: Practice using the Head-Tilt/Chin-Lift method to open the airway.
4.2.2 Maintaining The Airway
If breathing has been restored, the clear airway still must be maintained by keeping the head tilted back. One option is to ask another person to hold the head in place; even another survivor with minor injuries could do this. The airway also can be maintained by placing soft objects under the survivor’s shoulders to elevate the shoulders slightly and keep the airway open.
Remember that part of your mission is to do the greatest good for the greatest number of people. For that reason, if breathing is not restored on the first try using the Head-Tilt/Chin-Lift method, NERT responders should try again using the same method. If breathing cannot be restored on the second try, you must move on to the next survivor.
Remember the importance of opening the airway as quickly as possible. When treating the three killers, checking for airway obstruction is always first.
4.2.3 Controlling The Bleeding
An adult has about 4.5 to 6 liters of blood. Losing 1 liter of blood can be life threatening. If bleeding is not quickly controlled, the survivor may go into shock within a short period of time and die.
There are three types of bleeding and the type can usually be identified by how fast the blood flows:
- Arterial bleeding. Arteries transport blood under high pressure. Blood coming from an artery will spurt with each heartbeat.
- Venous bleeding. Veins transport blood under low pressure. Blood coming from a vein will flow.
- Capillary bleeding. Capillaries also carry blood under low pressure. Blood coming from capillaries will ooze.
Here are two main methods for controlling bleeding:
- Direct pressure
- Tourniquets
Direct pressure with elevation will control bleeding in 95% of cases.
TREATING LIFE-THREATENING CONDITIONS (CONTINUED)
4.2.4 Direct Pressure
The first way to try to control excessive bleeding is through applying direct pressure. To control and stop bleeding through direct pressure, follow the steps below.
Step 1: Find the source(s) of bleeding and place a sterile dressing (if available).
Step 2: If you have something to put in between the blood and your hands, use it. (e.g., clean gloves, a cloth, a plastic bag.)
Step 3: Apply firm, steady pressure directly on the source of the bleeding. Push hard to stop bleeding—even if it is painful to the injured!
Step 4: Keep pressure applied until EMS takes over care or bleeding has stopped. If you are unsure if bleeding has stopped, continue applying pressure and wait for EMS.
Some things to keep in mind when applying direct pressure:
• Try to provide a barrier against the blood, if possible. Gloves are best.
• Do not use the same gloves or barrier on more than one person.
• If your barrier becomes blood soaked, replace it, but do not layer more things on top of it.
• Do not place bulky layers in between your hands and the source of the wound because it decreases the effectiveness of the pressure.
• Correctly applied pressure may not be comfortable for the injured. Do not let up; hold pressure until EMS arrives.
• Direct pressure and elevation can take 5 to 7 minutes to stop the bleeding completely. The use of a dressing and pressure bandage allows the rescuer to move on to the next survivor.
• A pressure bandage may be tied in a bow, so that it can be loosened — rather than cut — to examine the wound and then re-tied. This procedure helps to conserve supplies and saves time. The pressure bandage maintains the direct pressure needed to stop the bleeding. NERT responders continue to reassess the survivor’s status regularly. If the survivor’s limb is turning blue or becoming numb below the bandage, then it should be loosened.
EXERCISE: CONTROLLING BLEEDINGPurpose: This exercise will provide a chance to practice using the techniques for controlling bleeding.** Instructions:After breaking into pairs, identify one person to take the role of the survivor.The injury is on the right forearm, just below the elbow.Apply a pressure bandage.Repeat the process twice.Swap roles and have the new rescuer complete the above steps.EXERCISE: CONTROLLING BLEEDINGPurpose: This exercise will provide a chance to practice using the techniques for controlling bleeding. Instructions:**After breaking into pairs, identify one person to take the role of the survivor.The injury is on the right forearm, just below the elbow.Apply a pressure bandage.Repeat the process twice.Swap roles and have the new rescuer complete the above steps.
Tourniquets
If you cannot stop the bleeding by applying direct pressure and EMS professionals are delayed in responding, a tourniquet may be a viable option to save a person from bleeding to death. Tourniquets have been used effectively in combat to control bleeding in a wounded soldier’s extremities (arms or legs) and are increasingly being used by uniformed responders in civilian emergencies. Tourniquets are safe and effective when applied appropriately; you are more likely to save a life than cause the loss of a limb if you use a tourniquet.
A tourniquet is a tight bandage, which when placed around a limb and tightened, cuts off the blood supply to the part of the limb beyond it.
If a commercial tourniquet is not readily available, you can try to create one yourself using something that is broad, flexible, strong, and able to be twisted, tightened, and secured, such as a webbed belt or luggage strap or material. Improvised tourniquets often fail, but you can attempt to use them as a last resort to at least slow the bleeding.
How to use a commercial tourniquet:
Step 1: Place as high as possible on the injured limb – closest to the torso. (You can place it over clothing.)
Step 2: Pull the strap through the buckle.
Step 3:Twist the rod (windlass) tightly until bleeding stops/slows significantly. (May be very painful.)
Step 4: Secure the rod.
Step 5:If bleeding does not stop, place a second tourniquet.
Step 6:Mark the patient in an obvious way that indicates that a tourniquet was used and includes the time/date it was applied.
Step 7:Leave in place until EMS takes over care
** Commercial Tourniquet**

- TREATING LIFE-THREATENING CONDITIONS (CONTINUED)
4.2.5 Controlling Bleeding Review
The two main ways to control excessive bleeding:
- Direct pressure
- Tourniquet
Bleeding must be controlled as quickly as possible so as not to endanger the survivor’s life from blood loss.
You should always wear your non-latex exam gloves, goggles, and an N95 mask as a protection against blood-borne pathogens, such as hepatitis and HIV.
TREATING LIFE-THREATENING CONDITIONS (CONTINUED)
Shock
Shock is a condition that occurs when the body is not getting enough blood flow. When blood doesn’t circulate, oxygen and other nutrients are not carried to tissues and organs. Blood vessels begin to close, and organs are damaged and, if left untreated, will shut down completely. Remaining in shock will lead to the death of cells, tissues, and entire organs. Shock can worsen very rapidly.
The body will initially compensate for blood loss and mask the symptoms of shock; therefore, shock is often difficult to diagnose. It is possible — and, in fact, common — for an individual suffering from shock to be fully coherent and not complaining of pain. Pay attention to subtle clues, as failure to recognize shock will have serious consequences.
The main signs of shock that NERT responders should look for are:
- Rapid and shallow breathing (greater than 30/minute)
- Capillary refill of greater than 2 seconds
- Failure to follow simple commands, such as “Squeeze my hand”
Evaluate Respirations (Breathing)
Note if the survivor’s breathing is rapid and shallow, i.e., more than 30 breaths per minute. If so, treat them for shock.
4.2.6 Evaluate Circulation
One way to test for circulation is the capillary refill test (blanch test). A good place to do the capillary refill test is a nail bed or the palm of one hand. After quickly squeezing the color out of your nail bed, you should see the color return to the tested area within 2 seconds. If not, treat them for shock.
Because the blanch test is not accurate in children, the presence of distal pulses or mental status should be used instead as the main indicator.
4.2.7 Evaluate Mentation
There are several ways to evaluate mental status such as asking, “Are you okay?” The simplest way is to determine if a patient can follow simple commands.
If you are concerned that there might be a language barrier or hearing impairment, reach out with both hands and squeeze one of the survivor’s hands. The person will squeeze back if they can. If they cannot follow simple commands, treat them for shock.
4.2.8 Treating For Shock
Avoid rough or excessive handling. Position the survivor on his or her back and elevate the feet 6 to 10 inches above the level of the heart to assist in bringing blood to the vital organs. It is important to maintain the survivor’s body temperature. If necessary, place a blanket or other material under and/or over the survivor to provide protection from extreme ground temperatures (hot or cold).
Although survivors who are suffering from shock may be thirsty, they should not eat or drink anything initially because they may also be nauseated.
4.2.9 Procedures for Controlling Shock
| Step | Action |
|---|---|
| 1 | Lay the patient down. |
| 2 | Maintain body temperature (e.g., cover the ground and the survivor with a blanket if necessary). |
| 3 | Maintain an open airway. |
| 4 | Control obvious bleeding. |
| Notes | Avoid rough or excessive handling. Do not provide food or drink. |
EXERCISE: TREATING SHOCKPurpose: This exercise offers you a chance to practice the steps for treating shock.Instructions:Break into the groups.The person who was the survivor first in the previous exercise will now be the rescuer first.Pretend that you are in the following situation:You have come upon an unconscious survivor who has been bleeding profusely from a wound of the upper arm for an undetermined period. You have controlled the bleeding.What do you need to do next?Switch places and have the survivor become the rescuerEXERCISE: TREATING SHOCKPurpose: This exercise offers you a chance to practice the steps for treating shock.Instructions:Break into the groups.The person who was the survivor first in the previous exercise will now be the rescuer first.Pretend that you are in the following situation:You have come upon an unconscious survivor who has been bleeding profusely from a wound of the upper arm for an undetermined period. You have controlled the bleeding.What do you need to do next?Switch places and have the survivor become the rescuer
TREATING LIFE-THREATENING CONDITIONS (CONTINUED)
4.3 Triage
In mass casualty events, there are generally three phases of patient care: Triage, Treatment, and Transportation.
Triage is a French word meaning “to sort.” During the Triage Phase, medical personnel:
- Identify the dead and those who are too severely injured to be saved
- Send those with relatively minor injuries and wounds to a holding area to await treatment
- Identify those who would die from life-threatening injuries and prioritize them for immediate treatment.
- Can perform RAPID treatment: open airways; stop bleeding; treat for shock.
- Limit their time with each patient to 30 seconds.
During the Triage Phase, survivors’ conditions are quickly evaluated, and the survivors are prioritized into one of four categories:
- Walking Wounded (GREEN): Patients that are able to walk. These survivors are marked with a green tag.
- Delayed (YELLOW): Injuries are not life threatening based on passing the test Thirty-2-Can Do (a test of Respirations, Circulation, and Mentation). The survivor may require professional care, but treatment can be delayed. These survivors are marked with a yellow tag.
- Immediate (RED): The survivor has life-threatening injuries based on failing the test Thirty-2-Can Do. The survivor has an issue with Respirations, Circulation, or Mentation that demands immediate attention to save his or her life; rapid, lifesaving treatment is urgent. These survivors are marked with a red tag.
- Dead (BLACK): No respiration after two attempts to open the airway. Because CPR is one-on-one care and is labor intensive, CPR is not performed when there are many more survivors than rescuers. These victims are marked with a black tag.
Thirty-2-Can Do TEST:
This is a three-part test to determine if a patient has adequate Respirations, Circulation, and Mentation. If a patient fails any one of the three parts, that patient should be tagged RED.
- Thirty: Respirations per minute
- less than 30 breaths per minute = Pass
- more than 30 breaths per minute = FAIL (tag RED, and move to next patient)
- ** 2 : Capillary Refill; time for color to return**:
- Less than 2 seconds = Pass
- More than 2 seconds = FAIL (tag RED, and move to next patient)
- Can Do: Can a patient follow simple commands?
- Yes = Pass
- No = FAIL(tag RED, and move to next patient)
After the Triage Phase is adequate, survivors are moved into the Treatment Phase. A Treatment Area is set up, where survivors are grouped in their categories, and the RED patients receive treatment priority. Once transport to a medical facility is available, the Transport Phase will begin where patients are transported to appropriate facilities.
NERT responders do not rescue or move those initially tagged with black tags.
It is crucial to the physical and mental well-being of disaster survivors that the morgue be placed away from the other groups. Traditionally, blue tarps are used to identify and conceal the morgue area .
Rescuer Safety During Triage
If hazardous materials become a danger on scene, rescuer safety is paramount. NERT responders should leave the scene to avoid harm and reduce the risk of spreading contamination.
Rescuer safety is crucial during triage. Rescuers must wear all safety equipment, including non-latex exam gloves, goggles, a helmet, and an N95 mask when examining survivors and should try to change gloves between survivors. Because of limited supplies, it may not be possible to use a new pair of gloves for every survivor. If this is the case, gloves may be sterilized between treating survivors using 1-part bleach to 10-parts water. Your disaster kit should have a box of non-latex gloves. Bleach and potable water should also be available at the NERT’s medical treatment area.
EXERCISE: REMOVING EXAM GLOVESPurpose: This exercise will allow you to practice proper technique for removing soiled exam gloves without spreading contaminants.Instructions:Put on a pair of gloves.Remove and dispose of your gloves as instructed.EXERCISE: REMOVING EXAM GLOVESPurpose: This exercise will allow you to practice proper technique for removing soiled exam gloves without spreading contaminants.Instructions:Put on a pair of gloves.Remove and dispose of your gloves as instructed.
4.3.1 Triage In a Disaster Environment
Here is the general procedure for NERTs to conduct triage:
- Step 1: Stop, Look, Listen, and Think. Before your team starts, stop and size up the situation by looking around and listening. Think about your safety, capability, and limitations, and decide if you will approach the situation. If you decide to proceed, quickly make a plan about your approach that all members understand.
- Step 2: Conduct voice triage. Begin by calling out, “Neighborhood Response Team. If you can walk, come to the sound of my voice.” Speak loudly and firmly. If there are survivors who are ambulatory, tag them GREEN and direct them to a designated location. If rescuers need assistance and there are ambulatory survivors, then these survivors may be asked to provide assistance. These persons may also provide useful information about the location of the survivors. Voice triage does not have to only happen once when you enter. You can basically use it as you approach every patient.
- Step 3: Start where you stand and follow a systematic route. Start with the closest survivor and work in a systematic fashion such that you do not miss any survivors.
- Step 4: Evaluate each survivor and tag them “I” (immediate= RED), “D” (delayed=YELLOW), “M” (minor=GREEN), or DEAD (=BLACK).** **Remember to evaluate the walking wounded. Remember to ASK for consent to treat if the individual is conscious
- Step 5: Perform RAPID treatment as necessary. Initiate airway management, bleeding control, and/or treatment for shock. All RED tagged patients should be treated for shock.
- Step 6: Do NOT take more than 30 seconds per patient. Triage as quickly as possible.
- Step 7: Document triage results for:
- Effective deployment of resources
- Information on the survivors’ locations
- A quick record of the number of casualties by degree of severity.
Your safety is paramount during triage. Wear proper protective equipment!
4.4 Evaluating a Survivor During Triage
| Step | Procedures |
|---|---|
| 1 | “Can you walk?” If yes, tag them GREEN (Minor) and direct them to the designated GREEN area. If not, go to Step 2. |
| 2 | Check Respiration (Breathing). At an arm’s distance, make contact with the survivor and speak loudly. If the survivor does not respond: Open the airway. Look, listen, and feel for breaths. Check breathing rate. Abnormally rapid respiration (above 30 per minute) indicates shock. Maintain the airway and treat for shock and tag them RED (Immediate) If breathing is below 30 per minute, then move to Step 3. If the victim is not breathing after two attempts to open airway, then tag BLACK (Dead) |
| 3 | Check Circulation (Cap Refill)/stop bleeding. Take immediate action to control severe bleeding. Check circulation using the blanch test (for capillary refill) Press on a nail bed (or palm of hand) until color is gone. Time how long it takes for normal color to return. Treat for shock if normal color takes longer than 2 seconds to return, and tag RED (Immediate). If capillary refill is less than 2 seconds, go to step 4. Or check the radial pulse. If present, continue to step 4. Note if the pulse is abnormal (rapid, thready, weak, etc.) If absent, tag RED (Immediate) and treat for shock. |
| 4 | Check mental status. Ask patient to follow a simple command. If they can, (and passed Respiration and Circulation), tag them YELLOW (Delayed). Inability to follow simple commands indicates that immediate treatment is necessary. Treat for shock and tag RED (Immediate). |
EVALUATING A SURVIVOR DURING TRIAGE (CONTINUED)
Time is critical in a disaster. You will not be able to spend much time with any single survivor. Remember to do the greatest good for the greatest number of survivors.
In order to respond effectively in a mass casualty event NERT responders must:
- Have a plan based on a thorough size up
- Follow that plan
- Document actions throughout
Triage must be practiced to learn to avoid triage pitfalls. Triage pitfalls include:
- No team plan, organization, or goal
- Indecisive leadership
- Too much focus on one patient
- Treatment (rather than triage) performed
- Team communications
Triage Decision Flowchart
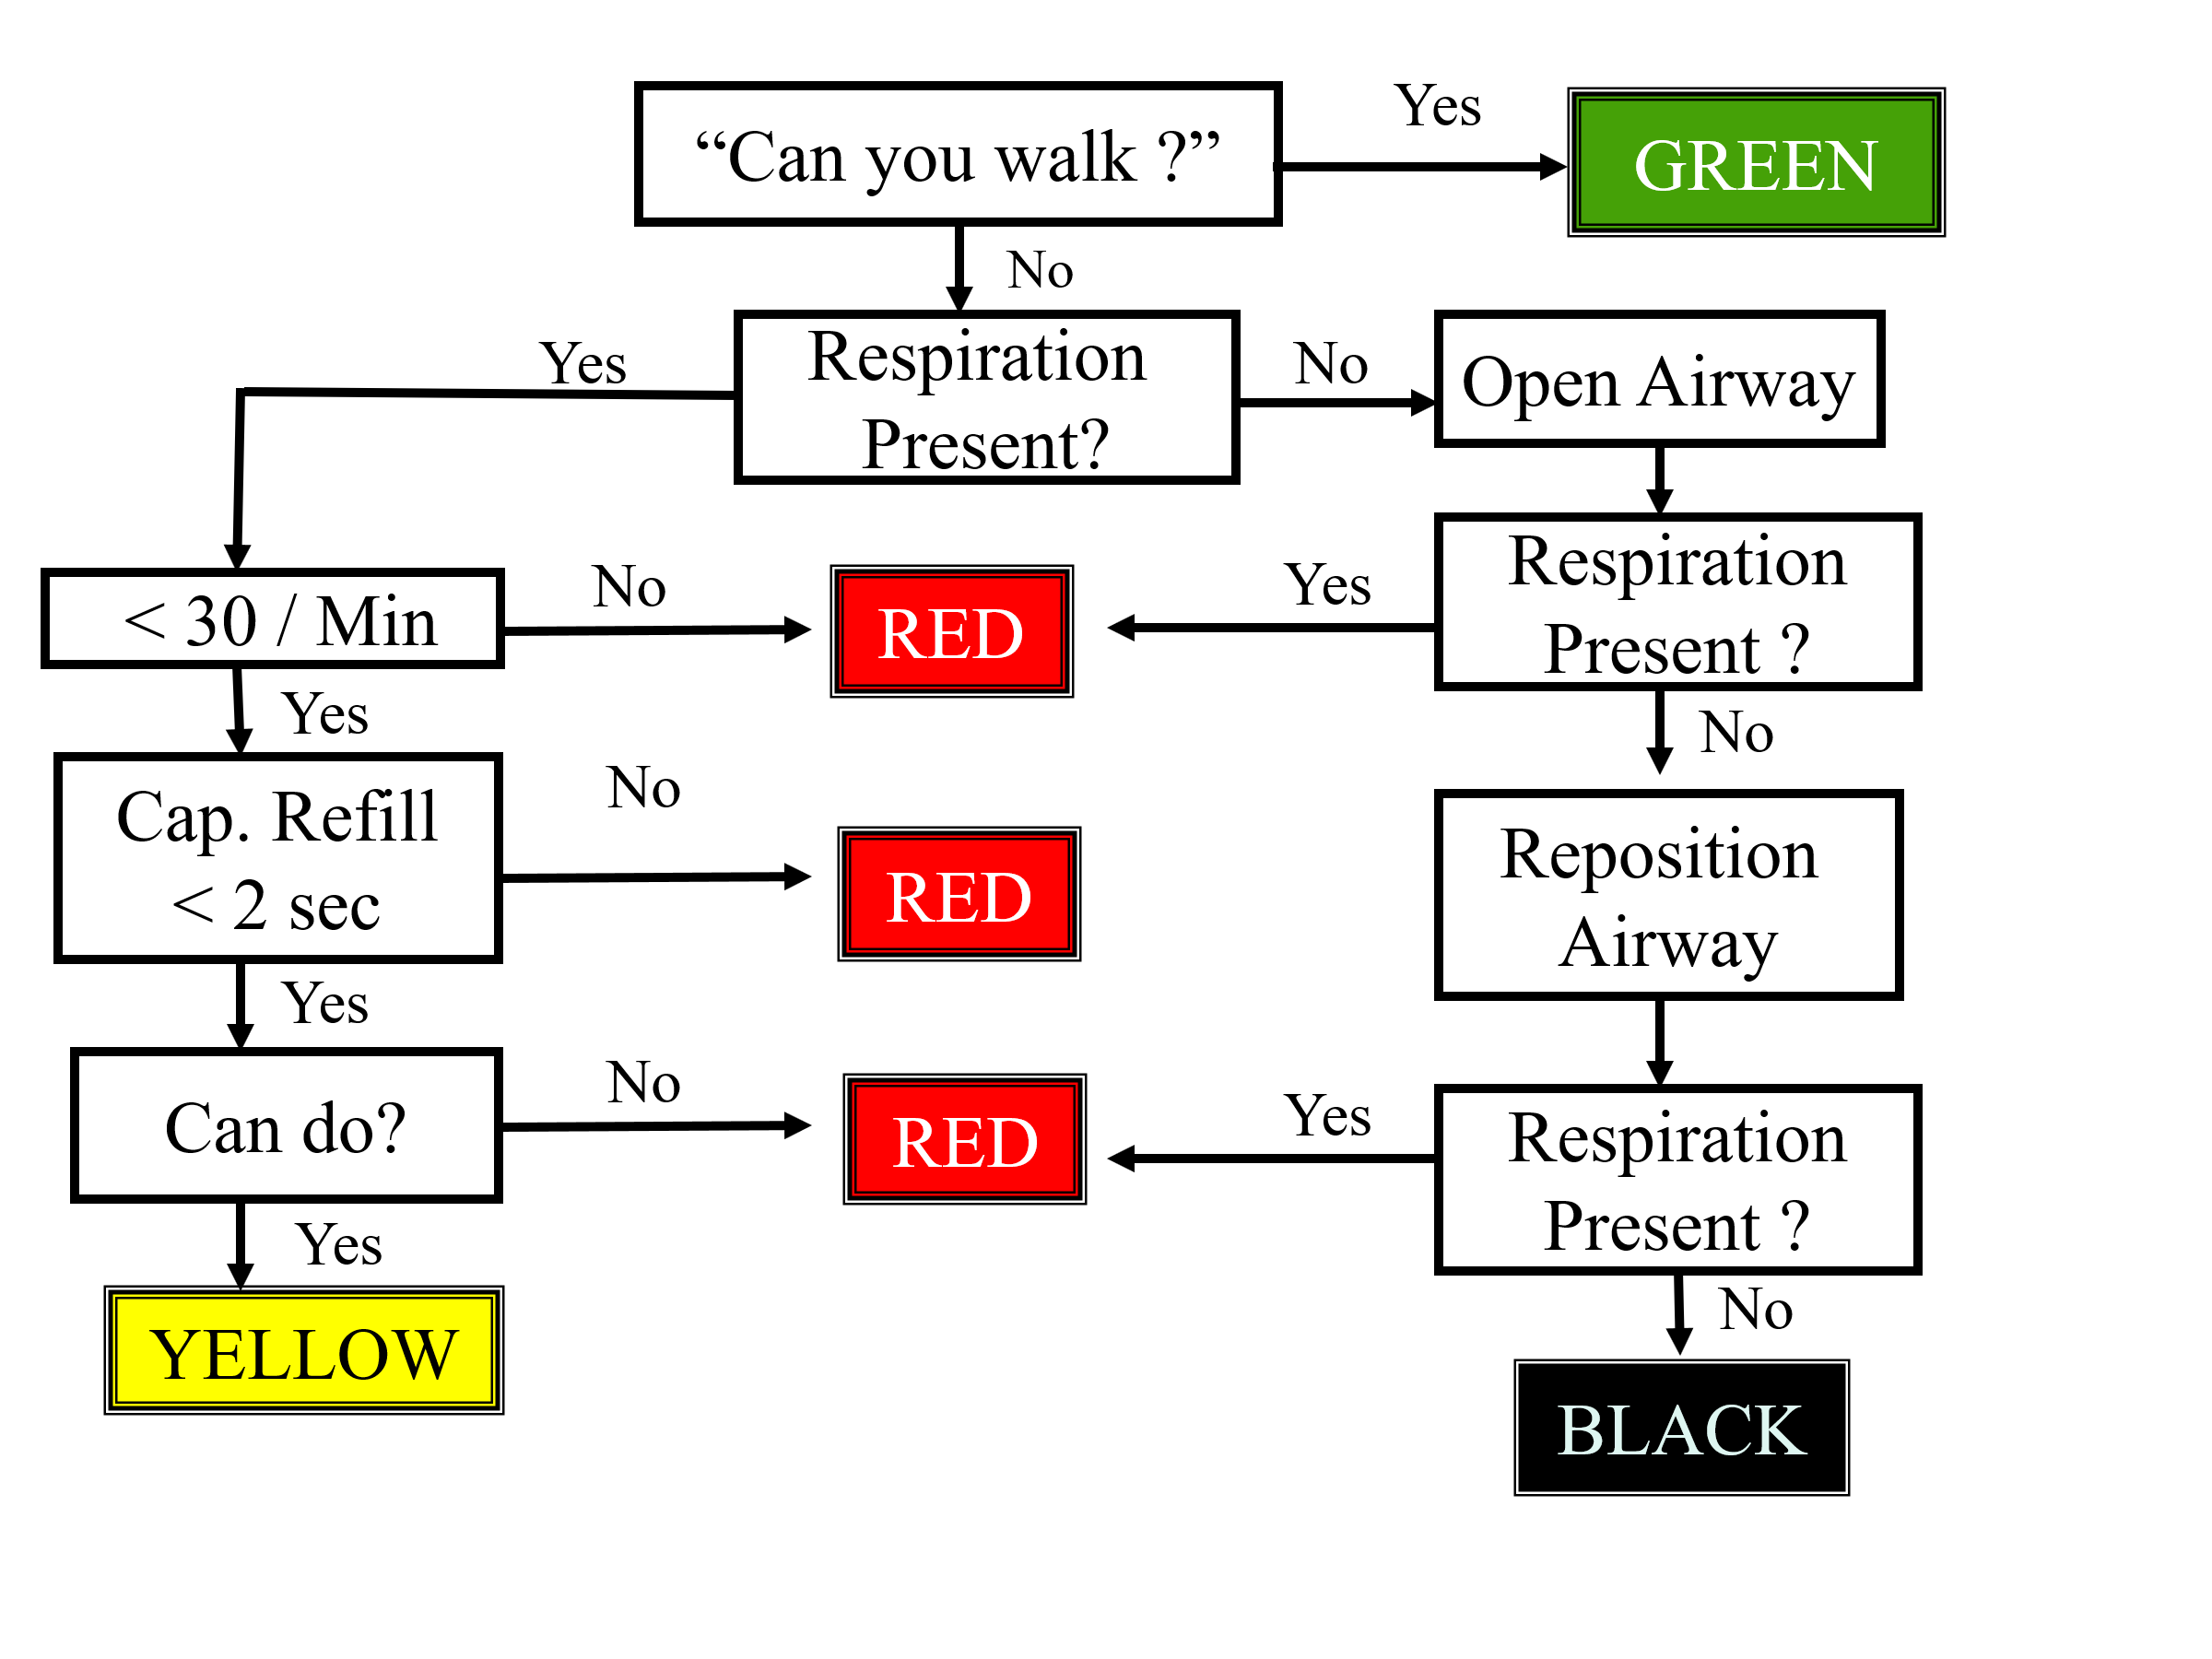
*The Jump Start Pediatric Triage Algorithm can be found in the appendix.
EVALUATING A SURVIVOR DURING TRIAGE (CONTINUED)
EXERCISE: CONDUCTING TRIAGEPurpose: This exercise will allow you to practice conducting triage in a high-pressure situation.Instructions:You will be placed into a rescue team.Teams are to perform triage on simulated patients. The rescuers will have a limited amount of time to:Choose a team leader and assign team member rolesSize up the situation and develop a plan of actionConduct triage and tag each survivor for treatmentDocument the number of survivors in each category of triage (Immediate, Delayed, Minor, Dead)EXERCISE: CONDUCTING TRIAGEPurpose: This exercise will allow you to practice conducting triage in a high-pressure situation.Instructions:You will be placed into a rescue team.Teams are to perform triage on simulated patients. The rescuers will have a limited amount of time to:Choose a team leader and assign team member rolesSize up the situation and develop a plan of actionConduct triage and tag each survivor for treatmentDocument the number of survivors in each category of triage (Immediate, Delayed, Minor, Dead)
CHAPTER 3 SUMMARY
NERT members’ ability to open airways, control bleeding, and treat shock is critical to saving lives.
- Use the Head-Tilt/Chin-Lift method for opening airways.
- Control bleeding using direct pressure, elevation, and/or pressure points.
- If there is a question about whether a survivor is in shock, treat for shock as a precaution.
Triage is a system for rapidly evaluating survivors’ injuries and prioritizing them for treatment.
There are 4 triage categories:
- Immediate (RED)
- Delayed (YELLOW)
- Minor (GREEN)
- Dead (BLACK)
Triage in a disaster environment consists of 6 important steps:
- Stop, Look, Listen and Think, and make a quick plan.
- Conduct voice triage.
- Begin where you stand and work systematically.
- Evaluate and tag all survivors.
- Treat those tagged “I” immediately.
- Document your findings.
The procedure for conducting triage evaluations involves checking:
- The airway and breathing rate
- Circulation and bleeding
- Mental status