5 Chapter 4: DISASTER MEDICAL OPERATIONS — PART 2
In this unit you will learn about:
Public Health Considerations: How to maintain hygiene and sanitation.
Functions of Disaster Medical Operations: What the five major functions of disaster medical operations are and how they are set up.
Disaster Medical Treatment Areas: How to establish them and what their functions are.
Patient Evaluation: How to perform a head-to-toe assessment to identify and treat injuries.
5.0.1 Basic Treatment—How to:
- Treat burns
- Dress and bandage wounds
- Treat fractures, dislocations, sprains, and strains
- Treat hypothermia
- Treat heat-related injuries
- Control nasal bleeding
- Treat bites and stings
5.1 CHAPTER 4 INTRODUCTION & OVERVIEW
CHAPTER 4 OBJECTIVES
At the end of this unit, you should be able to discuss:
- Taking appropriate sanitation measures to protect public health.
- Performing head-to-toe assessments on a patient.
- Establishing a treatment area.
- Applying splints to suspected fractures and sprains
- Employing basic treatments for other injuries
Chapter 4 Topics
- Public Health Considerations
- Functions of Disaster Medical Operations
- Establishing Medical Treatment Areas
- Conducting Head-to-Toe Assessments
- Treating Burns
- Wound Care
- Treating Fractures, Dislocations, Sprains, and Strains
- Nasal Injuries
- Treating Cold-Related Injuries
- Treating Heat-Related Injuries
- Bites and Stings
5.2 PUBLIC HEALTH CONSIDERATIONS
During disaster, public health becomes a concern. Measures must be taken by individual NERT responders and the team to avoid the spread of disease.
The primary public health measures include:
- Maintaining proper hygiene
- Maintaining proper sanitation
- Purifying water (if necessary)
- Preventing the spread of disease
Maintaining Hygiene
Maintenance of proper personal hygiene is critical even under makeshift conditions.
Some steps that individuals should take to maintain hygiene are to:
- Wash hands frequently using soap and water. Hand washing should be thorough (at least 15 to 20 seconds of vigorous rubbing on all surfaces of the hand).
Alcohol-based hand sanitizers — which don’t require water — are a good alternative to hand washing. The Centers for Disease Control (CDC) recommends products that are at least 60% alcohol. To use an alcohol-based hand sanitizer, apply about ½ teaspoon of the product to the palm of your hand. Rub your hands together, covering all surfaces, until hands are dry.
- Wear non-latex exam gloves at all times when examining and/or treating each patient. Change or disinfect gloves after treating each individual. As explained earlier, under field conditions, individuals can use rubber gloves that are sterilized between treating survivors using bleach and water (1-part bleach to 10-parts water).
- Wear an N95 mask and goggles.
- Keep dressings sterile. Do not remove the overwrap from dressings until use. After opening, use the entire package of dressing, if possible.
- Thoroughly wash areas that come in contact with body fluids with soap and water or diluted bleach as soon as possible.
Maintaining Sanitation
Poor sanitation is also a major cause of infection. NERT medical operations responders can maintain sanitary conditions:
- Control the disposal of bacterial sources (e.g., soiled gloves, dressings, etc.)
- Put waste products in plastic bags, tying off the bags. Mark them as medical waste. Keep medical waste separate and dispose of it as hazardous waste.
PUBLIC HEALTH CONSIDERATIONS (CONTINUED)
Water Purification
Potable water supplies are often in short supply or are not available in a disaster. Water can be purified for drinking, cooking, and medical use by heating it to a rolling boil for 1 minute or by using water purification tablets or non-perfumed liquid bleach.
5.2.1 Ratios for Purifying Water with Non-Perfumed Bleach (Per FEMA)
| Water Quantity | Bleach Added |
|---|---|
| 1 Quart 1 Gallon 5 Gallons | 4 Drops 16 Drops 5/8 Teaspoon |
Note: If water is cloudy, double the recommended dosage of bleach.
After adding bleach, shake— or stir the water container and let it stand 30-60 minutes before drinking.
Note that if the solution does not smell or taste of bleach, add another six drops of bleach, and let the solution stand for 15 minutes before using.
Rescuers should not put anything on wounds other than purified water. The use of other solutions (e.g., hydrogen peroxide) on wounds must be the decision of trained medical personnel.
Preventing The Spread of Disease
NERT responders must use non-latex exam gloves, goggles, and an N95 mask during all medical operations. Cover all open wounds as a way of preventing the spread of infection.
FUNCTIONS OF DISASTER MEDICAL OPERATIONS
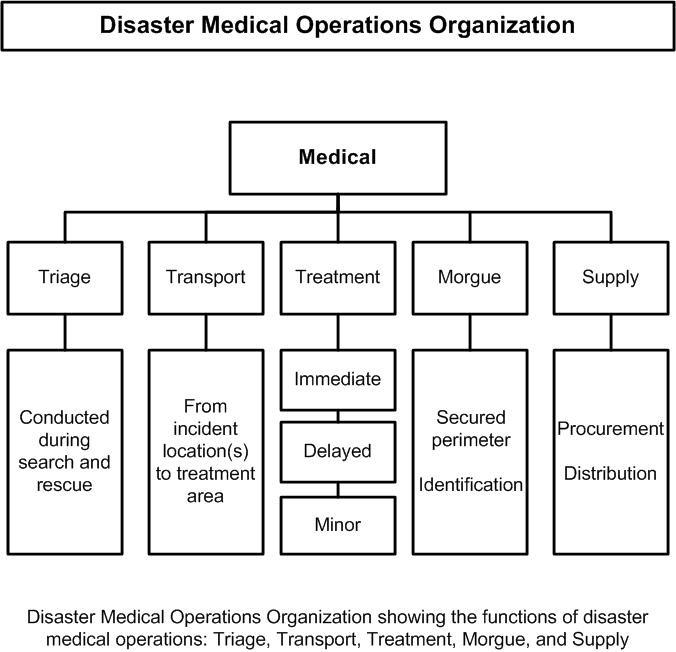
There are five major functions of disaster medical operations:
- Triage: The initial assessment and sorting of survivors for treatment based on the severity of their injuries
- Treatment: The disaster medical services provided to survivors
- Transport: The movement of survivors to the treatment area or hospital .
- Morgue: The temporary holding area for victims who have died at the treatment area. Those who are tagged as “Dead” during triage are not removed from the incident site.
- Supply: The hub for crucial supply procurement and distribution
5.3 ESTABLISHING MEDICAL TREATMENT AREAS
Because time is critical when NERTs activate, medical operations responders will need to select a site and set up a treatment area as soon as injured survivors are confirmed.
Determining the best location(s) for the NERT treatment area should include the following overall considerations:
- Safety for rescuers and survivors
- Most effective use of resources, e.g., NERT responders themselves, time, medical supplies.
- The treatment area is set up near the site where the survivors are found. Do not plan to bring injured survivors to the NERT responder staging area. (Staging covered in Chapter 6)
Safety For Rescuers & Survivors
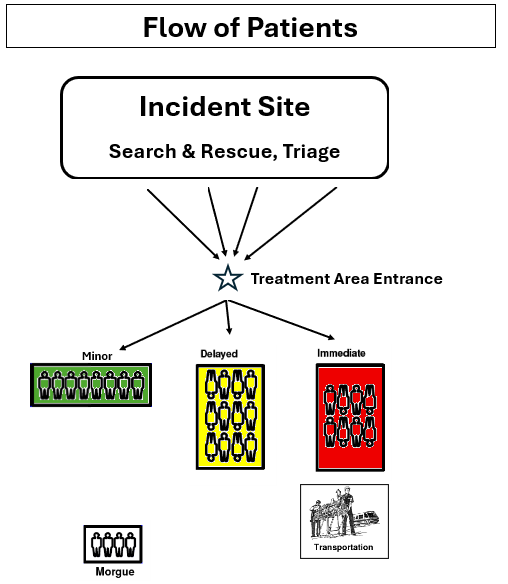
As survivors are located, rescued, and triaged, they are moved to a location where they can be treated. The severity of the damage and the safety of the immediate environment determine where the initial NERT treatment area should be located. In all cases, remember that your safety is the number one priority.
- In structures with light damage, NERT responders triage the survivors as they are located. Further medical treatment is performed in a safe location inside the structure where survivors are organized according to the extent of their injuries.
- In structures with moderate damage, NERT responders also triage the survivors as they are located; however, survivors are sent to a medical treatment location that is a safe distance from the incident location. Survivors are organized according to the extent of their injuries.
Whether the treatment area is set up inside or a safe distance from the structure, a morgue may need to be set up as a temporary holding area for victims who die at the treatment area.
In addition to the severity of the damage to the structure where survivors are found, there are two other important safety considerations:
- The treatment area itself must be free of hazards and debris.
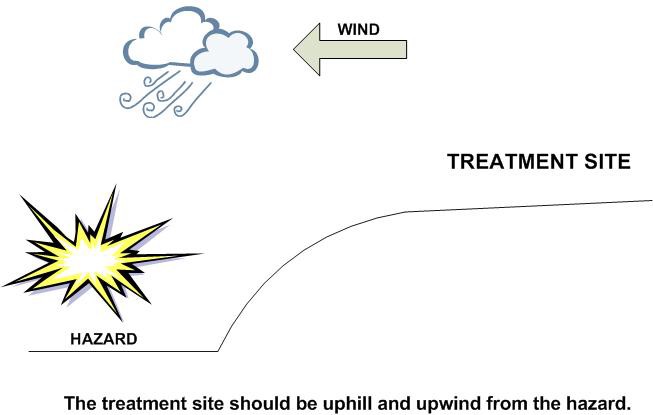
- The site should be close to but uphill and upwind from the hazard zone.
ESTABLISHING MEDICAL TREATMENT AREAS (CONTINUED)
Most Effective Use of NERT Resources
In addition to the safety of rescuers and survivors, a second overall consideration for setting up treatment areas is how to make the best use of NERT resources, e.g., NERT responders themselves, time, medical supplies, and equipment.
To help meet the challenge of limited resources, particularly if initial treatment operations will continue for some time, NERTs may need decentralized treatment locations and/or may establish one central medical treatment location, depending on the circumstances.
Decentralized Treatment Sites: In a widespread event with many injured, it is sometimes necessary to set up and maintain more than one medical treatment location, especially when a central treatment location would be a considerable distance from the initial treatment site.
- A medical treatment location would be set up close to, but a safe distance from, each of the damaged sites. Each of the treatment locations would include areas for Immediate, Delayed, and Minor survivors and a morgue.
- Survivors remain under treatment at the location until they can be transported to a location for professional medical care or to the NERT’s main treatment area.
Centralized Treatment Site: In an event with one or a few injured survivors at each of several sites, the NERT may need to establish one central medical treatment location. A centralized location may need to be set up even when there are decentralized sites established.
- The location would include treatment areas for Immediate, Delayed, and Minor survivors, and a morgue.
- Survivors are moved from where they were rescued, triaged, and initially treated to the central location, and remain under treatment there until they can be transported to a location for professional medical treatment.
- A central medical treatment location allows for effective use of resources since a limited number of NERT medical operation responders in one location can take care of a greater number of survivors.
- Professional EMS will generally be able to transport the injured more efficiently from one central location than from multiple decentralized locations.
Whether a treatment site is centralized or one of several decentralized sites are established, the location(s) selected should be:
- Accessible by transportation vehicles (ambulances, trucks, helicopters, etc.)
- Expandable
5.3.1 Treatment Area Site Selection
Treatment Area Layout
Signs or colored tarps should be used to identify the subdivisions of the area. The treatment area must be protected and clearly delineated:
- Immediate care RED
- Delayed care YELLOW
- Minor injuries/walking wounded GREEN
- Deceased for the morgue BLACK
ESTABLISHING MEDICAL TREATMENT AREAS (CONTINUED)
The Yellow and Red areas should be relatively close to each other to allow:
- Verbal communication between workers in the treatment areas
- Shared access to medical supplies (which should be cached in a central location)
- Easy transfer of patients whose status has changed
Survivors who have been identified with minor injuries may choose to stay at the treatment area or leave. If they stay, they can assist NERT responders. If they leave, it should be documented.
Place survivors in the treatment area in a head-to-toe configuration, with 2 to 3 feet between survivors. This system will provide:
- Effective use of space
- Effective use of available personnel. As a team member finishes one head-to-toe assessment, he or she turns around and is at the head of the next patient.
The morgue site should be secure, away from and not visible from the treatment area. This will help reduce the potential psychological impact on those in the treatment area.
Pre-planning for NERT medical operations includes equipment needed to set up the treatment area, such as ground covers or tarps and signs
5.3.2 Treatment Area Site Layout
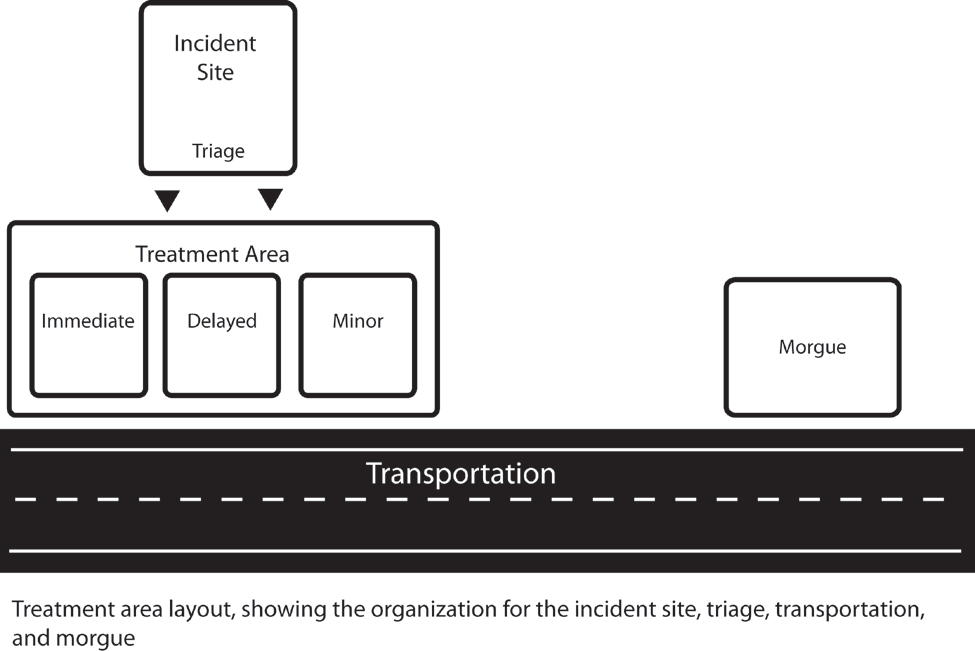
The distance shown between the Incident Site/Triage and the Treatment Area will depend on whether the treatment location is site specific or more centralizedThe distance shown between the Incident Site/Triage and the Treatment Area will depend on whether the treatment location is site specific or more centralized
ESTABLISHING MEDICAL TREATMENT AREAS (CONTINUED)
Treatment Area Organization
There is an obvious need for planning before disaster strikes, including roles of personnel assigned to the treatment area. The NERT must assign leaders to maintain control in each of the medical treatment area subdivisions. These leaders will:
- Ensure orderly survivor placement
- Direct team members to conduct head-to-toe assessments
- Document
It is very important to thoroughly document the survivors in the treatment area, including:
- Name, address, and phone number if survivor can talk
- Description (age, sex, body build, estimated height)
- Clothing
- Injuries
- Treatment
- Transfer location
CONDUCTING HEAD-TO-TOE ASSESSMENTS
The first steps that you will take when working with a survivor will be to conduct triage and rapid treatment. After all survivors in an area have been triaged and moved to a medical treatment area, NERT responders will begin a thorough head-to-toe assessment of each survivor’s condition.
During triage, you are keeping an eye out for “the killers”:
- Airway obstruction
- Excessive bleeding
- Signs of shock
A head-to-toe assessment goes beyond the “killers” to try to gain more information to determine the nature of the survivor’s injury. The entire assessment must be performed before initiating treatment.
OBJECTIVES OF HEAD-TO-TOE ASSESSMENTS
- Determine, as clearly as possible, the extent of injuries
- Determine what type of treatment is needed
- Document injuries
Always wear your safety equipment when conducting head-to-toe assessments.
What To Look For in Head-To-Toe Assessments
The medical community uses the acronym DCAP-BTLS to remember what to look for when conducting a rapid assessment. DCAP-BTLS stands for the following:
- Deformities
- Contusions (bruising)
- Abrasions
- Punctures
- Burns
- Tenderness
- Lacerations
- Swelling
When conducting the assessment, look for DCAP- BTLS in all parts of the body.
Remember to provide IMMEDIATE treatment for life-threatening injuries.
Pay attention to how people have been hurt (the mechanism of injury). It provides insight to probable injuries suffered.
CONDUCTING HEAD-TO-TOE ASSESSMENTS (CONTINUED)
5.3.3 How To Conduct a Head-to-Toe Assessment
Whenever possible, ask the person about any injuries, pain, bleeding, or other symptoms. If the survivor is conscious, NERT responders should always ask permission to conduct the assessment. The survivor has the right to refuse treatment. Talking with the conscious patient reduces anxiety.
Head-to-Toe assessments should be:
- Conducted on all survivors, even those who seem all right
- Verbal (if the patient is able to speak)
- Hands-on. Do not be afraid to remove clothing to look.
Conduct Head-to-Toe assessments systematically; doing so will make the procedure quicker and more accurate with each assessment.
Pay careful attention:
- Look, listen, and feel for anything unusual
- Suspect a spinal injury in all unconscious survivors and treat accordingly
- Remember to check your own hands for patient bleeding as you perform the head-to- toe assessment.
Check body parts from the top to the bottom for continuity of bones and soft tissue injuries (DCAP-BTLS) in the following order:
- Head
- Neck
- Shoulders
- Chest
- Arms
- Abdomen
- Pelvis
- Legs
While conducting a head-to-toe assessment, NERT responders should always check for:
- CMS (Circulation, Movement, Sensation) in all extremities
- Medical ID emblems on bracelets or on neck chains
CONDUCTING HEAD-TO-TOE ASSESSMENTS (CONTINUED)
5.3.4 Closed-Head, Neck & Spinal Injuries
When conducting head-to-toe assessments, rescuers may come across survivors who have or may have suffered closed-head, neck, or spinal injuries.
A closed-head injury is a concussion-type injury, as opposed to a laceration, although lacerations can be an indication that the survivor has suffered a closed-head injury.
The main objective when NERT responders encounter suspected injuries to the head or spine is to do no harm. Minimize movement of the head and spine while treating any other life-threatening conditions.
5.3.5 Signs of a Closed-Head, Neck, or Spinal Injury
The signs of a closed-head, neck, or spinal injury most often include:
- Change in consciousness
- Inability to move one or more body parts
- Severe pain or pressure in head, neck, or back
- Tingling or numbness in extremities
- Difficulty breathing or seeing
- Heavy bleeding, bruising, or deformity of the head or spine
- Blood or fluid in the nose or ears
- Bruising behind the ear
- “Raccoon” eyes (bruising around eyes)
- “Uneven” pupils
- Seizures
- Nausea or vomiting
- Survivor found under collapsed building material or heavy debris
If the survivor is exhibiting any of these signs, he or she should be treated as having a closed-head, neck, or spinal injury.
CONDUCTING HEAD-TO-TOE ASSESSMENTS (CONTINUED)
5.3.6 Stabilizing The Head
In a disaster environment, ideal equipment is rarely available. NERT responders may need to be creative by:
- Looking for materials that can be used as a backboard — a door, desktop, building materials — anything that might be available.
- Looking for items that can be used to stabilize the head on the board — towels, draperies, or clothing — by tucking them snugly on either side of the head to immobilize it.
Remember: Moving survivors with suspected head, neck, or spinal injury requires sufficient survivor stabilization. If the rescuer or survivor is in immediate danger, however, safety is more important than any potential spinal injury and the rescuer should move the survivor from the area as quickly as possible.
EXERCISE: CONDUCTING HEAD-TO-TOE ASSESSMENTPurpose: This exercise will give you a chance to practice conducting head-to-toe assessments.Instructions:After breaking into pairs, the person on the right will be the survivor.The rescuer will conduct a head-to-toe assessment following the previously demonstrated procedure. Repeat.After making two observed head-to-toe assessments, the survivor and the rescuer swap roles.EXERCISE: CONDUCTING HEAD-TO-TOE ASSESSMENTPurpose: This exercise will give you a chance to practice conducting head-to-toe assessments.Instructions:After breaking into pairs, the person on the right will be the survivor.The rescuer will conduct a head-to-toe assessment following the previously demonstrated procedure. Repeat.After making two observed head-to-toe assessments, the survivor and the rescuer swap roles.
TREATING BURNS
Burn-Related Size Up
The first step in treating burns is to conduct a thorough size up:
- What caused the burn?
- Is the danger still present?
- When did the burning cease?
Burn Treatment
The objectives of first aid treatment for burns are to:
- Cool the burned area to stop the burning process
- Cover with a sterile cloth to reduce the risk of infection (by keeping fluids in and germs out)
Burns may be caused by heat, chemicals, electrical current, or radiation. The severity of a burn depends on the:
- Temperature of the burning agent
- Period of time that the survivor was exposed
- Area of the body that was affected
- Size of the area burned
- Depth of the burn
Burn Classifications
The skin has three layers:
- The epidermis, or outer layer of skin, contains nerve endings and is penetrated by hairs.
- The dermis, or middle layer of skin, contains blood vessels, oil glands, hair follicles, and sweat glands.
- The subcutaneous layer, or innermost layer, contains blood vessels and overlies the muscles.
Depending on the severity, burns may affect all three layers of skin.
TREATING BURNS (CONTINUED)
5.3.7 Burn Classification
| Classification | Skin Layers Affected | Signs |
|---|---|---|
| Superficial | Epidermis | Reddened, dry skin Pain Swelling (possible) |
| Partial Thickness | Epidermis Partial destruction of dermis | Reddened, blistered skin Wet appearance Pain Swelling (possible) |
| Full Thickness | Complete destruction of epidermis and dermis Possible subcutaneous damage (destroys all layers of skin and some or all underlying structures) | Whitened, leathery, or charred (brown or black) Painful or relatively painless |
5.3.8 List of Guidelines for Treating Burns
- Remove the survivor from the burning source. Put out any flames and remove smoldering clothing unless it is stuck to the skin.
- Cool skin or clothing, if they are still hot, by immersing them in cool water for not more than 1 minute or covering with clean compresses that have been soaked in cool water and wrung out. Cooling sources include water from the bathroom or kitchen; garden hose; and soaked towels, sheets, or other cloths. Treat all survivors of full thickness burns for shock.
Infants, young children, and older persons, and persons with severe burns, are more susceptible to hypothermia. Therefore, rescuers should use caution when applying cool dressings on such persons. A rule of thumb is do not cool more than 15% of the body surface area (the size of one arm) at once, to reduce the chances of hypothermia.
- Cover loosely with dry, sterile dressings to keep air out, reduce pain, and prevent infection.
- Wrap fingers or toes loosely and individually when treating burns to hands and feet.
- Loosen clothing near the affected area. Remove jewelry if necessary, taking care to document what was removed, when, and to whom it was given.
- Elevate burned extremities higher than the heart.
TREATING BURNS (CONTINUED)
What NOT to do when treating burns
- Do not use ice. Ice causes vessel constriction.
- Do not apply antiseptics, ointments, or other remedies.
- Do not remove shreds of tissue, break blisters, or remove adhered particles of clothing. (Cut burned-in clothing around the burn.)
5.3.9 Guidelines For Treating Inhalation Burns
Remember that 60 to 80% of fire fatalities are the result of smoke inhalation. Whenever fire and/or smoke is present, NERT responders should assess survivors for signs and symptoms of smoke inhalation.
These are indicators that an inhalation burn is present:
- Sudden loss of consciousness
- Evidence of respiratory distress or upper airway obstruction
- Soot around the mouth or nose
- Singed facial hair
- Burns around the face or neck
The patient may not present these signs and symptoms until hours (sometimes up to a full 24 hours) after the injury occurred, and such symptoms may be overlooked when treating more obvious signs of trauma.
Smoke inhalation is the number one fire-related cause of death. If NERT responders have reason to suspect smoke inhalation, be sure the airway is maintained, and alert a medical professional as soon as possible.
5.3.10 General Guideline for Treating Chemical & Inhalation Burns
Chemical and inhalation burns vary from traditional heat-related burns in their origin and treatment. Keep in mind that suspicion of either chemical or inhalation burns elevates the survivor’s status to Red, Immediate.
TREATING BURNS (CONTINUED)
5.3.11 Guidelines For Treating Chemical Burns
Unlike more traditional burns, chemical burns do not result from extreme heat, and therefore treatment differs greatly.
Chemical burns are not always obvious. You should consider chemical burns as a possibility if the survivor’s skin is burning and there is no sign of a fire.
- Protect yourself from contact with the substance. Use your protective gear — especially goggles, mask, and gloves.
- Ensure that any affected clothing or jewelry is removed.
- If the irritant is dry, gently brush away as much as possible. Always brush away from the eyes and away from the survivor and you.
- Use lots of cool running water to flush the chemical from the skin for 15 minutes. Running water will dilute the chemical to prevent the injury from getting worse.
- Apply cool, wet compress to relieve pain.
- Cover the wound very loosely with a dry, sterile or clean cloth so that the cloth will not stick to the wound.
- Treat for shock if appropriate.
WOUND CARE
The main treatment for wounds includes:
- Control bleeding
- Clean the wound
- Apply dressing and bandage
Treatment for controlling bleeding was covered in Chapter 3. The focus of this section is on cleaning and bandaging, which will help to prevent secondary infection.
5.3.12 Cleaning The Wound
Wounds should be cleaned by irrigating with clean, room temperature water.
A bulb syringe is useful for irrigating wounds. In a disaster, a turkey baster may also be useful.
Do Not…
- Do not use hydrogen peroxide to irrigate the wound.
- Do not scrub the wound.
When the wound is thoroughly cleaned, you will need to apply a dressing and bandage to help keep it clean and control bleeding.
There is a difference between a dressing and a bandage:
- A dressing is applied directly to the wound. Whenever possible, a dressing should be sterile.
- A bandage holds the dressing in place.
Rules Of Dressing Wounds
- If there is active bleeding (i.e., if the dressing is soaked with blood), redress over the existing dressing and maintain pressure and elevation to control bleeding.
- If there is no active bleeding, remove the dressings, flush the wound, and then check for signs of infection at least every 4 to 6 hours.
Signs of possible infection include:
- Swelling around the wound site
- Discoloration
- Discharge from the wound
- Red striations from the wound site
- If necessary and based on reassessment and signs of infection, change the treatment priority (e.g., from Delayed to Immediate).
5.3.13 Bandaging Wounds
If a wound is still bleeding, the bandage should place enough pressure on the wound to help control bleeding without interfering with circulation.
WOUND CARE (CONTINUED)
Amputations
The main treatments for amputation (the traumatic severing of a limb or other body part) are to:
- Control bleeding
- Treat shock
When the severed body part can be located, NERT responders should:
- Save tissue parts, wrapped in clean material and placed in a plastic bag, if available. Label them with the date, time, and survivor’s name.
- Keep the tissue parts cool, but NOT in direct contact with ice
- Keep the severed part with the survivor
Impaled Objects
Sometimes, you may also encounter some survivors who have foreign objects lodged in their bodies — usually as the result of flying debris during the disaster.
When a foreign object is impaled in a patient’s body, NERT responders should:
- Immobilize the affected body part
- Not attempt to move or remove the object, unless it is obstructing the airway
- Control bleeding at the entrance wound without placing pressure on the object
- Clean and dress the wound making sure to stabilize the impaled object. Wrap bulky dressings around the object to keep it from moving.
TREATING FRACTURES, DISLOCATIONS, SPRAINS, AND STRAINS
The objective when treating a suspected fracture, sprain, or strain is to immobilize the injury and the joints immediately above and below the injury site.
NERT responders should treat the injury as a fracture if uncertain of the type of injury. It is difficult to distinguish among fractures, sprains, or strains.
Fractures
A fracture is a complete break, a chip, or a crack in a bone. There are several types of fractures.
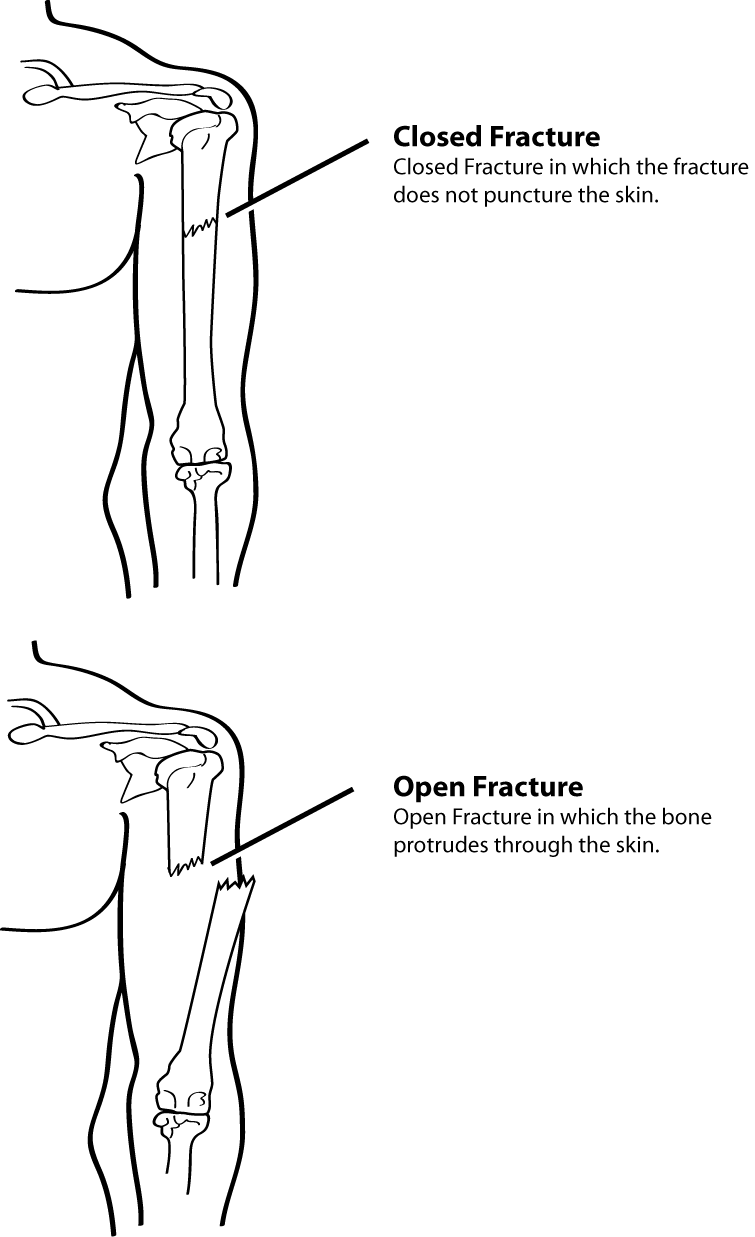
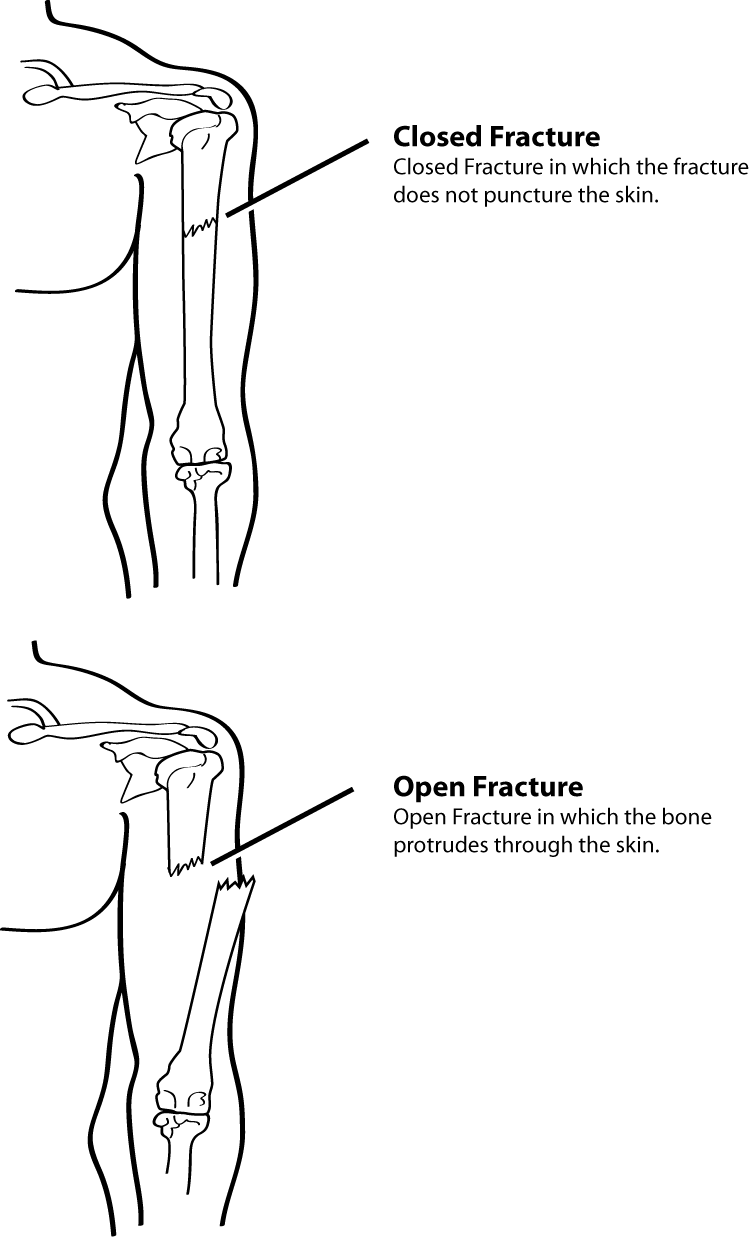
- A closed fracture is a broken bone with no associated wound. First aid treatment for closed fractures may require only splinting.
- An open fracture is a broken bone with some kind of wound that allows contaminants to enter into or around the fracture site.
5.3.14 Closed and Open Fractures
TREATING FRACTURES, DISLOCATIONS, SPRAINS, AND STRAINS
** (CONTINUED)**
Treating An Open Fracture
Open fractures are more dangerous than closed fractures. They pose a significant risk of severe bleeding and infection. Therefore, they need to be checked more frequently.
- Do not draw the exposed bone ends back into the tissue.
- Do not irrigate the wound.
NERT Responders should:
- Cover the wound with a sterile dressing
- Splint the fracture without disturbing the wound
- Place a moist 4 by 4-inch dressing over the bone end to keep it from drying out
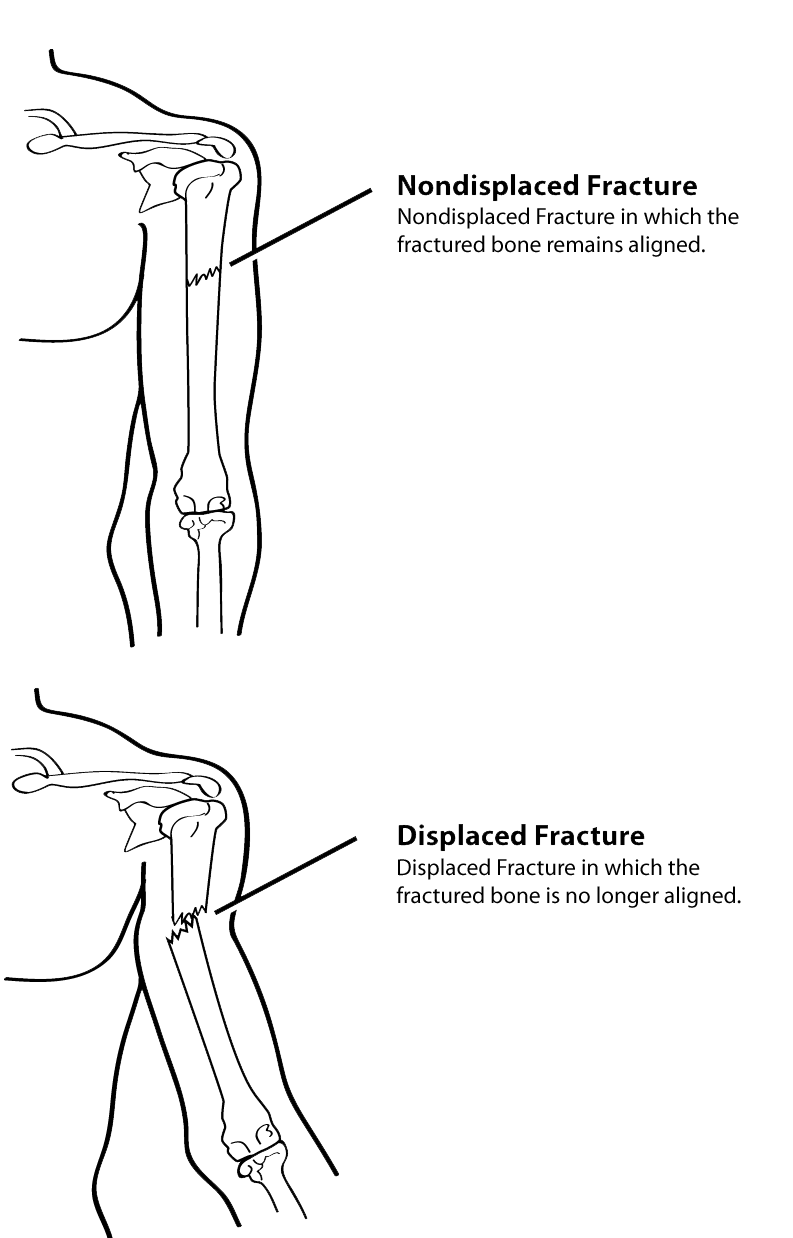
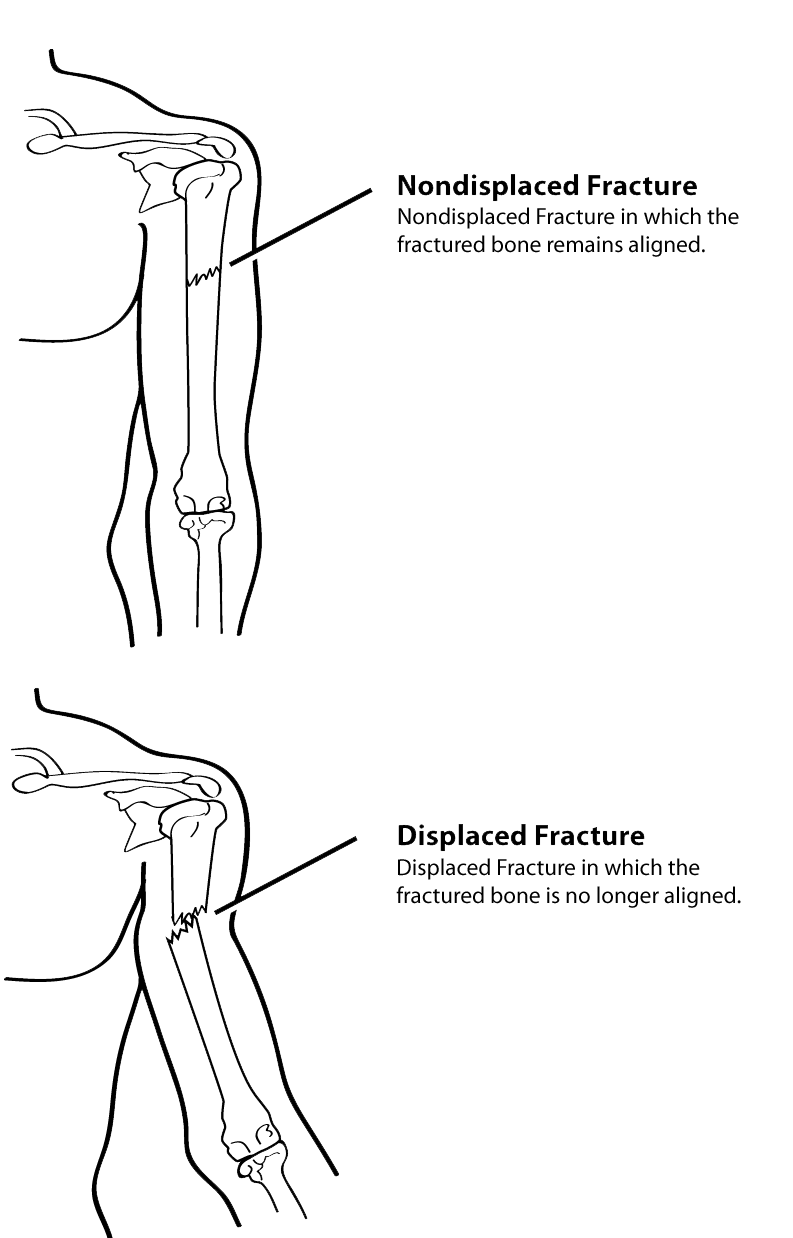
Displaced Fracture
If the limb is angled, then there is a displaced fracture. Displaced fractures may be
described by the degree of displacement of the bone fragments.
Nondisplaced Fractures
Nondisplaced fractures are difficult to identify. The main signs are pain and swelling.
Treat a suspected fracture as a fracture until professional treatment is available.
5.3.15 Displaced and Nondisplaced Fractures
TREATING FRACTURES, DISLOCATIONS, SPRAINS, AND STRAINS
(CONTINUED)
Treating Dislocations
Dislocations are another common injury in emergencies. A dislocation is an injury to the ligaments around a joint that is so severe that it permits a separation of the bone from its normal position in a joint. The signs of a dislocation are similar to those of a fracture.
A suspected dislocation should be treated like a fracture.
- Assess PMS (Pulse, Movement, Sensation) in the affected limb before and after splinting/immobilization.
- If PMS is compromised, the patient’s treatment priority is elevated to “I - IMMEDIATE”
- Immobilize the joint until professional medical help is available.
Do not try to relocate a suspected dislocation.
Treating Sprains & Strains
A sprain involves a stretching or tearing of ligaments at a joint and is usually caused by stretching or extending the joint beyond its normal limits.
A sprain is considered a partial dislocation, although the bone either remains in place or is able to fall back into place after the injury.
The most common signs of a sprain are:
- Tenderness at the site of the injury
- Swelling and/or bruising
- Restricted use or loss of use
The signs of a sprain are similar to those of a nondisplaced fracture. Therefore, you should treat it by immobilization and elevation.
A strain involves a stretching and/or tearing of muscles or tendons. Strains most often involve the muscles in the neck, back, thigh, or calf.
In some cases, strains may be difficult to distinguish from sprains or fractures. Whether an injury is a strain, sprain, or fracture, treat the injury as if it is a fracture.
TREATING FRACTURES, DISLOCATIONS, SPRAINS, AND STRAINS
(CONTINUED)
Splinting
Splinting is the most common procedure for immobilizing an injury. Cardboard is the material typically used for makeshift splints, but splints can be made with:
- Soft materials: Towels, blankets, or pillows, tied with bandaging materials or soft cloths
- Rigid materials: A board, metal strip, folded magazine or newspaper, or the like.
- Anatomical splints may also be created by securing a fractured bone to an adjacent unfractured bone. Anatomical splints are usually reserved for fingers and toes, but, in an emergency, legs may also be splinted together.
Soft materials should be used to fill the gap between the splint and the body part.
Prepare For Swelling
With this type of injury, there will be swelling. Remove restrictive clothing, shoes, and jewelry when necessary to prevent these items from acting as unintended tourniquets.
SPLINT ILLUSTRATIONS
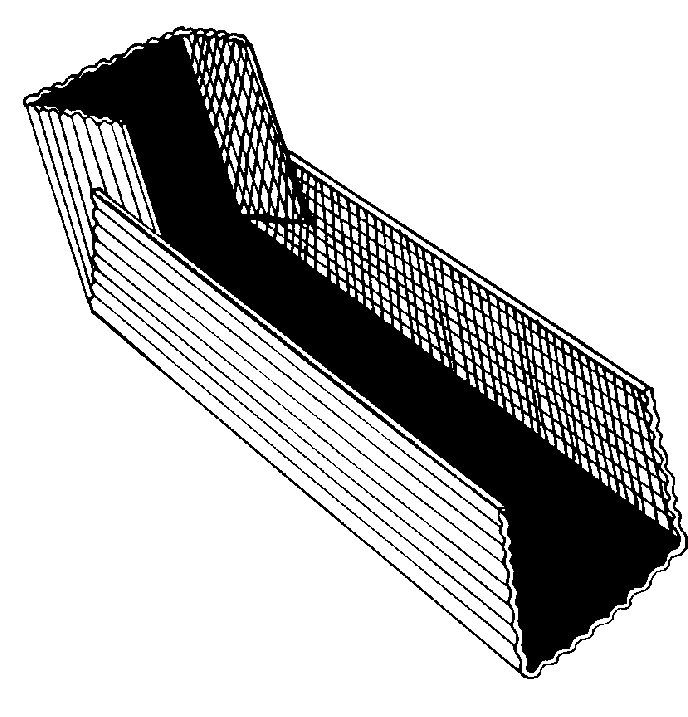
Cardboard Splint
Cardboard Splint in which the edges of the cardboard are turned up to form a “mold” in which the injured limb can rest.
TREATING FRACTURES, DISLOCATIONS, SPRAINS, AND STRAINS
(CONTINUED)
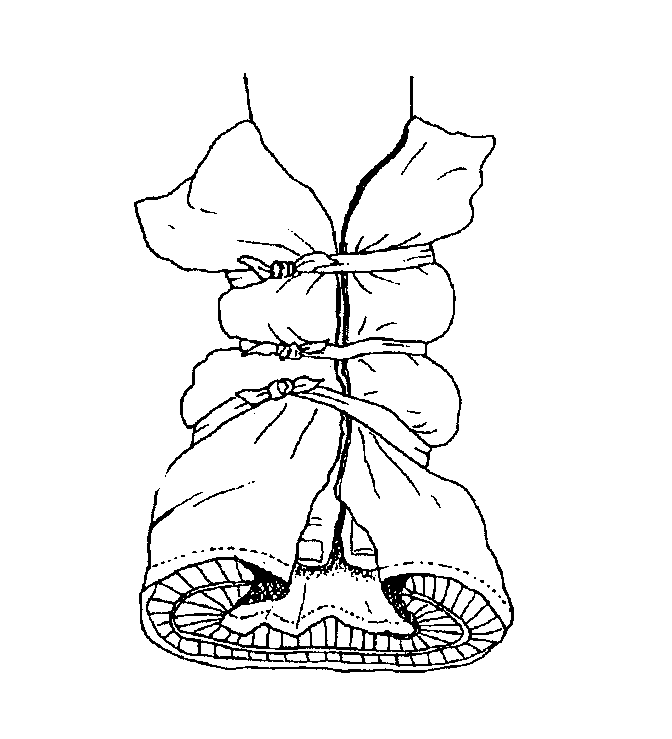
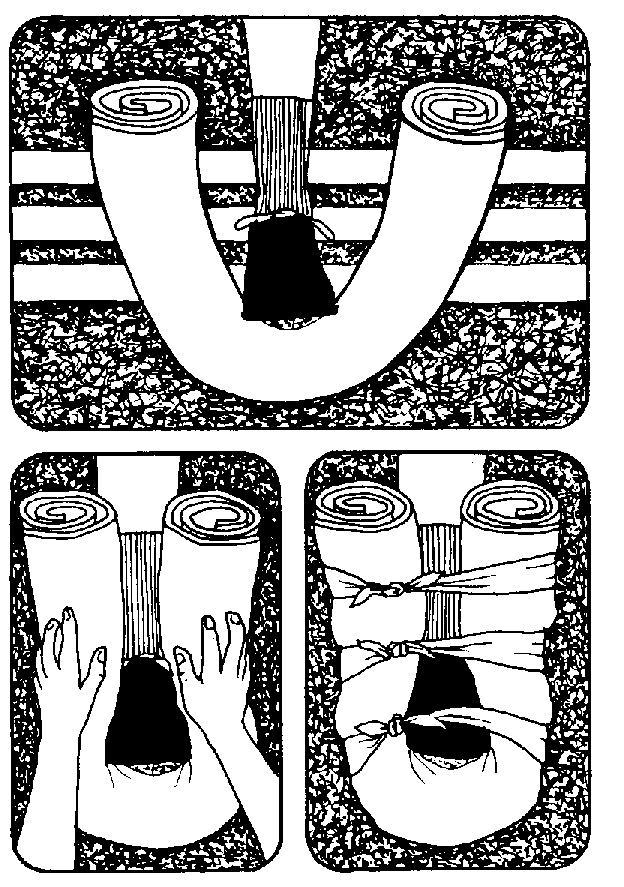
Splinting Using a Towel
Splinting using a towel, in which the towel is rolled up and wrapped around the limb, then tied in place.
Pillow splint
Pillow splint, in which the pillow is wrapped around the limb and tied.
5.3.16 Splint Illustrations
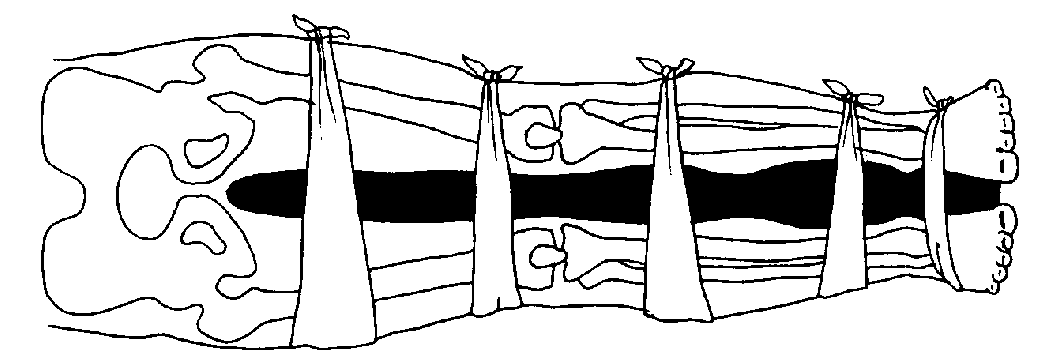
Anatomical Splint
Anatomical splint in which the injured leg is tied at intervals to the non-injured leg, using a blanket as padding between the legs.
We will not have time to practice splinting in this course. CPR/FA training is available through NERT. Check the Website for details.
NASAL INJURIES
Bleeding from the nose can be caused by several causes:
- Blunt force to the nose
- Skull fracture
- Non-trauma-related conditions such as sinus infections, high blood pressure, and bleeding disorders
A large blood loss from a nosebleed can lead to shock. Actual blood loss may not be evident because the survivor will swallow some amount of blood. Those who have swallowed large amounts of blood may become nauseated and vomit.
Control nasal bleeding:
- Do not tilt the head back.
- Have the survivor sit with the head slightly forward so that blood trickling down the throat will not be breathed into the lungs.
- Pinch the nostrils together
- Put pressure on the upper lip just under the nose
- Ensure that the survivor’s airway remains open
- Keep the survivor quiet. Anxiety will increase blood flow.
TREATING COLD-RELATED INJURIES
Hypothermia is a condition that occurs when the body’s temperature drops below normal.
Hypothermia may be caused by exposure to cold air or water or by inadequate food combined with inadequate clothing and/or heat, especially in older people.
The primary signs and symptoms of hypothermia are:
- A body temperature of 95° F (37° C) or lower
- Redness or blueness of the skin
- Numbness accompanied by shivering
In later stages, hypothermia will be accompanied by:
- Slurred speech
- Unpredictable behavior
- Listlessness
TREATING COLD-RELATED INJURIES (CONTINUED)
Treat survivors who have been rescued from cold air or water environments because hypothermia can set in within only a few minutes
For Conscious Hypothermia Survivors
- Remove wet clothing.
- Wrap the survivor in a blanket or sleeping bag and cover the head and neck.
- Protect the survivor against the weather.
- Provide warm, sweet drinks and food to conscious survivors. Do not offer alcohol.
- Do not attempt to use massage to warm affected body parts.
- Place the survivor in a warm bath.
- Do not allow the survivor to walk around even when he or she appears to be fully recovered. If the survivor must be moved outdoors, cover the survivor’s head and face.
For Unconscious Hypothermia Survivors
Place an unconscious survivor in the recovery position:
- Place the survivor’s arm that is nearest to you at a right angle against the ground, with the palm facing up.
- Move the survivor’s other arm across his or her chest and neck, with the back of the survivor’s hand resting against his or her cheek.
- Grab a hold of the knee furthest from you and pull it up until the knee is bent and the foot is flat on the floor.
- Pull the knee toward you and over the survivor’s body while holding the survivor’s hand in place against his or her cheek.
- Position the survivor’s leg at a right angle against the floor so that the survivor is lying on his or her side.
Frostbite
Frostbite occurs when extremely cold tissue shuts down blood flow to extremities, causing tissue death. A person’s blood vessels constrict in cold weather in an effort to preserve body heat. In extreme cold, the body will further constrict blood vessels in the extremities in an effort to shunt blood toward the core organs (heart, lungs, intestines, etc.). The combination of inadequate circulation and extreme temperatures will cause tissue in these extremities to freeze, and in some cases, tissue death will result. Frostbite is most common in the hands, nose, ears, and feet.
There are several key signs and symptoms of frostbite:
- Skin discoloration (red, white, purple, black)
- Burning or tingling sensation, at times not localized to the injury site
- Partial or complete numbness
TREATING COLD-RELATED INJURIES (CONTINUED)
Treating Frostbite
A patient suffering from frostbite must be warmed slowly! Thawing the frozen extremity too rapidly can cause chilled blood to flow to the heart, which can shock or stop it.
- Immerse injured area in warm (NOT hot) water, approximately 107.6° F.
- Wrap affected body parts in dry, sterile dressing. It is vital to complete this task carefully to reduce the likelihood of further tissue damage.
Do Not..
- Do not allow the body part to re-freeze as this will exacerbate the injury.
- Do not attempt to use massage to warm body parts. Frostbite results in the formation of ice crystals in the tissue. Rubbing could potentially cause a great deal of damage.
TREATING HEAT-RELATED INJURIES
There are several heat-related injuries that you may encounter in a disaster scenario:
- Heat cramps are muscle spasms brought on by over-exertion in extreme heat.
- Heat exhaustion occurs when an individual exercises or works in extreme heat, resulting in loss of body fluids through heavy sweating. Blood flow to the skin increases, causing blood flow to decrease to the vital organs. This results in shock.
- Heat stroke is life-threatening. The survivor’s temperature control system shuts down. Body temperature can rise so high that brain damage and death may result.
Heat Exhaustion Symptoms:
- Cool, moist, pale, or flushed skin
- Heavy sweating
- Headache
- Nausea or vomiting
- Dizziness and Exhaustion
A patient suffering heat exhaustion will have a near normal body temperature. If left untreated, heat exhaustion will develop into heat stroke.
Heat Stroke Symptoms:
- Hot, red skin
- Lack of perspiration
- Changes in consciousness
- Rapid, weak pulse and rapid, shallow breathing
In a heat stroke survivor, body temperature can be very high — as high as 105º F. If an individual suffering from heat stroke is not treated, death can result.
TREATING HEAT-RELATED INJURIES (CONTINUED)
Heat Exhaustion & Heat Stroke Treatment
Treatment is similar for both heat exhaustion and heat stroke.
- Remove the survivor out of the heat and place in a cool environment.
- Cool the body slowly with cool, wet towels or sheets. If possible, in a cool bath.
- Have the survivor drink water, SLOWLY, at the rate of approximately half a glass of water every 15 minutes. Consuming too much water too quickly will cause nausea and vomiting in a survivor of heat sickness.
- If the survivor is experiencing vomiting, cramping, or is losing consciousness, DO NOT administer food or drink. Alert a medical professional as soon as possible and keep a close watch on the individual until professional help is available.
BITES AND STINGS
The specific symptoms vary, but, generally, bites and stings are accompanied by redness, itching, tingling or burning at the site of the injury, and often a welt on the site.
Treating Bites & Stings
- Remove the stinger if still present by scraping the edge of a credit card or other stiff, straight-edged object across the stinger. Do not use tweezers; these may squeeze the venom sac and increase the amount of venom released.
- Wash the site thoroughly with soap and water.
- Place ice (wrapped in a washcloth) on the site of the sting for 10 minutes and then off for 10 minutes. Repeat this process.
You may help the survivor take his or her own allergy medicine (Benadryl, etc.), but you may NOT dispense medications.
Allergic Reactions to Bites & Stings
The greatest concern with any insect bite or sting is a severe allergic reaction, or anaphylaxis. Anaphylaxis occurs when an allergic reaction becomes so severe that the airway is compromised. If you suspect anaphylaxis:
- Check airway and breathing.
- Calm the individual.
- Remove constrictive clothing and jewelry as body parts can swell.
- If possible, find and help administer a survivor’s Epi-pen. Many severe allergy sufferers carry one at all times.
- Watch for signs of shock and treat appropriately.
CHAPTER 4 SUMMARY
To safeguard public health, take measures to maintain proper hygiene and sanitation, and purify water if necessary. All public health measures should be planned in advance and practiced during exercises.
Disaster medical operations:
- Triage
- Treatment
- Transport
- Document
Treatment areas must be established as soon as casualties are confirmed and should:
- Be in a safe area that is close to, but uphill, upwind from the hazard area
- Accessible by transportation vehicles
- Expandable
Depending on the circumstances, a NERT may establish a central medical treatment location and/or treatment location at incident sites where many survivors are injured.
Head-to-toe assessments should be verbal and hands-on. Always conduct head-to-toe assessments in the same way — beginning with the head and moving toward the feet. If injuries to the head, neck, or spine are suspected, the objective is to avoid additional injury. Use stabilization and a backboard if the survivor must be moved.
Burns are classified as superficial, partial thickness, or full thickness depending on severity and the depth of skin layers involved. Remove the source of the burn, cool the burn, and cover it. For full thickness burns, always treat for shock.
The main first aid treatment for wounds consists of controlling bleeding, dressing and bandaging. In the absence of active bleeding, dressings must be removed, and the wound checked for infection at least every 4 to 6 hours. If there is active bleeding, a new dressing should be placed over the existing dressing.
Treat suspected fractures, sprains, and strains by immobilizing the affected area using a splint. Fractures, dislocations, sprains, and strains may have similar signs.
Warm hypothermia and frostbite survivors slowly.
Anaphylaxis is the most critical concern when an insect bite is suspected. Know how to use an Epi-pen and make sure to monitor the survivor’s airway until professional help arrives.
HOMEWORK ASSIGNMENT
Read and become familiar with Chapter 5: search and rescue operations.
Try practicing a rapid head-to-toe assessment on a friend or family member.