3 Chapter 2: FIRE SAFETY, UTILITY CONTROL & HAZARDOUS MATERIAL
In this unit you will learn about:
- SFFD: Who we are, and our disaster limitations
- Rescuer Safety: Equipment and considerations for volunteer rescuers
- Home Fire Safety tools: How installing fire and carbon monoxide (CO) alarms and practicing escape plans saves lives
- Fire Chemistry: How fire occurs, classes of fire, and choosing the correct means to extinguish each type of fire.
- Size-up and Fire Considerations: How to conduct the continual data-gathering and evaluation process at the scene of a disaster or emergency, and apply it to evaluate fires, assess firefighting resources, and determine a course of action, including if you should attempt to extinguish a fire; how to approach and extinguish safely.
- Portable Fire Extinguishers: Types of portable fire extinguishers and how to operate them.
- Utility Hazards and Control: Utility hazards, signs of danger and methods to control shut offs.
- Hazardous Materials: How to identify potentially dangerous materials in storage, in transit, and in your home. Protective actions. Safe disposal.
3.1 CHAPTER 2 INTRODUCTION & OVERVIEW
During, and immediately following a severe emergency, the first priorities of professional fire services are life safety and extinguishing major fires.
Responders may be hampered by impassable roads, weather conditions, inadequate water supply, and other inadequate resources.
CHAPTER 2 OBJECTIVES
At the end of this unit, you should be able to:
- Explain the role that NERTs play in fire safety.
- Identify and reduce potential fire and utility risks in the home and workplace.
- Describe the 9-step NERT size up process.
- Conduct a basic size up for a fire emergency.
- Explain minimum safety precautions, including:
Safety equipment
Utility control
Buddy system
Backup teams
- Identify locations of hazardous materials in the community and the home and reduce the risk from hazardous materials in the home.
- Extinguish small fires using a fire extinguisher.
3.1.1 Chapter 2 Topics
This unit will provide you with the knowledge and skills that you will need to reduce or eliminate fire hazards and extinguish small fires. These include:
- Fire chemistry
- Fire and utility hazards in the home, workplace, and neighborhood
- NERT size up: Fire size up considerations
- Firefighting resources
- Fire suppression safety
- Hazardous materials awareness
In class 6, you will have an opportunity to use a portable extinguisher to put out a fire.
3.1.2 NERTS…
Extinguish small fires before they become major fires.
This unit will provide training on how to use an extinguisher to put out small fires and how to recognize when a fire is too big to handle. As a general rule, if you can’t put out a fire in 5 seconds, it is already too big to handle, and you should leave the premises immediately.
Prevent additional fires by removing fuel sources.
This unit will also describe how to ensure that a fire, once extinguished, is completely extinguished and stays extinguished. This process is called overhaul.
Shut off utilities when necessary and safe to do so.
Assist with evacuations where necessary
When a fire is beyond the ability of NERTs to extinguish or a utility emergency has occurred, NERT responders may need to protect lives by evacuating the area and establishing a perimeter.
NERT Priorities
NERTs play a very important role in neighborhood and workplace fire and utility safety by helping in fire and utility related emergencies before professional responders arrive. When responding, NERT members should keep in mind the following standards:
Rescuer safety is always the number one priority. Therefore, NERTs always:
- Work with a buddy
- Wear safety equipment (gloves, helmet, goggles, N95 mask, sturdy shoes/boots)
The NERT goal is to do “The Most Good for the Most People”.
3.2 FIRE CHEMISTRY
Fire requires three elements to exist:
- Heat is required to elevate the temperature of a material to its ignition point.
- Fuel for a fire may be a solid, liquid, or gas. The type and quantity of fuel will determine which method should be used to extinguish the fire.
- Oxygen: Most fires will burn vigorously in any atmosphere of at least 20% oxygen.
- Without oxygen, most fuels could be heated until entirely vaporized, yet would not burn.
- The three elements, the fire triangle, create a chemical exothermic reaction, which is fire.
The Fire Triangle
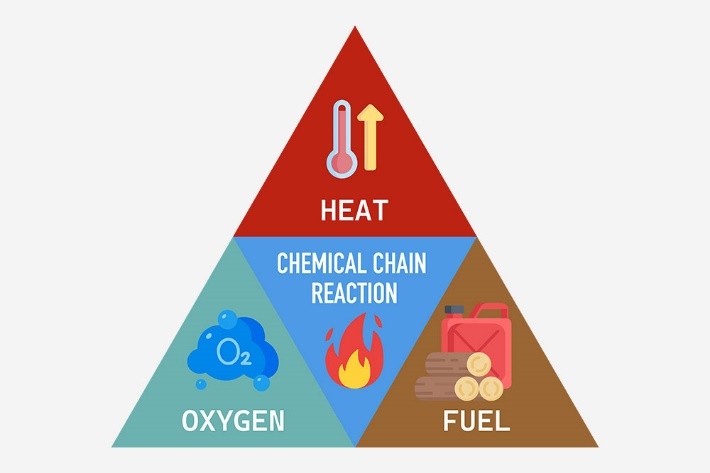
Fire Triangle: Fuel, oxygen, and heat create a chemical reaction, which causes fire.
3.2.1 Classes of Fire
To aid in extinguishing fires, fires are categorized into classes based on the type of fuel
- Class A Fires: Ordinary combustibles such as paper, cloth, wood, rubber, and many plastics
- Class B Fires: Flammable liquids (e.g., oils, gasoline) and combustible liquids (e.g., charcoal lighter fluid, kerosene). These fuels burn only at the surface because oxygen cannot penetrate the depth of the fluid. Only the vapor burns when ignited.
- Class C Fires: Energized electrical equipment (e.g., wiring, motors). When the electricity is turned off, the fire becomes a Class A fire.
- Class D Fires: Combustible metals (e.g., aluminum, magnesium, titanium)
- Class K Fires: Cooking oils (e.g., vegetable oils, animal oils, fats)
It is extremely important to identify the type of fuel feeding the fire in order to select the correct method and agent for extinguishing the fire.
3.3 FIRE AND UTILITY HAZARDS
This section will deal with identifying and preventing fire and utility hazards in the home and workplace.
Each of us has some type of fire or utility hazard in our home and workplace. Most of these hazards fall into three categories:
- Electrical hazards
- Natural gas hazards
- Flammable or combustible liquids
Homes and workplaces can and do have other hazards, including incompatible materials stored near each other, such as flammables/combustibles, corrosives, compressed gases, and explosives.
Simple fire prevention measures will help reduce the likelihood of fires:
- First, locate potential sources of ignition.
- Then, do what you can to reduce or eliminate the hazards.
3.3.1 Electrical Hazards
Here are some examples of common electrical hazards and simple ways that they can be reduced or eliminated:
- Avoid the “electrical octopus.” Eliminate tangles of electrical cords. Don’t overload electrical outlets. Don’t plug power strips into other power strips.
- Don’t run electrical cords under carpets.
- Check for and replace broken or frayed cords immediately.
- Maintain electrical appliances properly. Repair or replace malfunctioning appliances.
3.3.2 Responding To Electrical Emergencies
Electrical emergencies sometimes occur despite our best efforts. Every member of the household should be aware of the following procedures in the event of an electrical emergency:
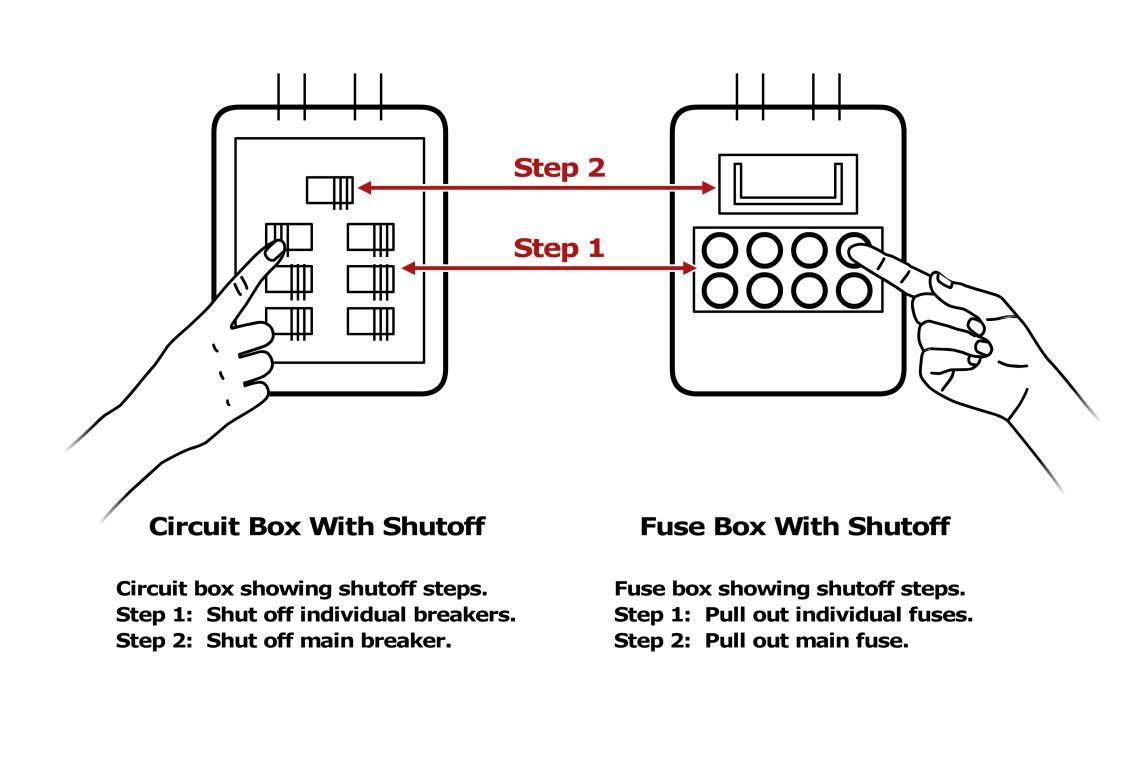
- Locate the circuit breakers or fuses and know how to shut off the power. Post shutoff instructions next to the breaker box or fuse box.
- Unscrew individual fuses or switch off smaller breakers first, then pull the main switch or breaker.
- When turning the power back on, turn on the main switch or breaker first, then screw in the fuses or switch on the smaller breakers, one at a time.
You should not enter a flooded basement or standing water to shut off the electrical supply because water conducts electricity.
FIRES AND UTILITY HAZARDS
3.3.3 CIRCUIT BOX AND FUSE BOX
FIRE AND UTILITY HAZARDS (CONTINUED)
3.3.4 Natural Gas Hazards & Awareness
Natural gas presents two types of hazards. It is an:
- Asphyxiant - that robs the body of oxygen
- Explosive - that can easily ignite
Here are several examples for monitoring natural gas in your home:
- Natural gas detector: install near the furnace, hot water tank, and gas appliances such as clothes dryer or stove. Test the detector monthly to ensure that it works.
- Carbon monoxide (CO) detector: install near the sleeping area. Additional detectors may be installed on every level of the home and in every bedroom. Detectors should not be placed within 15 feet of heating or cooking appliances or in or near very humid areas such as bathrooms. Test the detector monthly.
- Locate and label the gas shutoff valve(s). Know how to shut off the gas and have the proper non-sparking tool for shutting off the gas.
Natural Gas Meter with Shut-off Valve
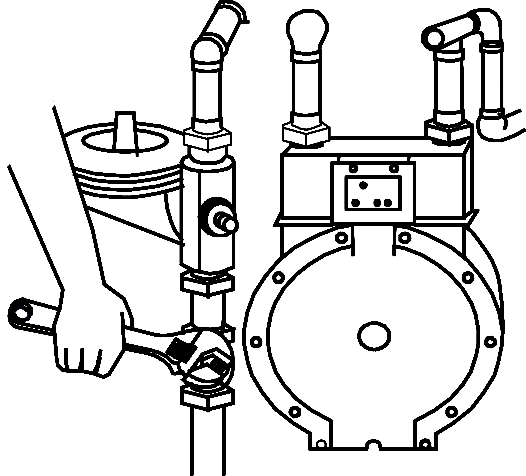


The gas meter shutoff diagram indicates the shutoff valve location on the pipe that comes out of the ground. To turn off the valve, use a non-sparking wrench to turn the valve clockwise one-quarter turn. Remember that, in all cases, natural gas flow should only be turned on by a licensed technician.
Please note: Some gas meters have automatic shutoff valves that restrict the flow of gas during an earthquake or other emergency. These are installed by a licensed plumber, downstream of the utility point of delivery. If you are unsure whether your home has this shutoff device, contact your gas service company. If this shutoff device is closed, only a qualified professional should restore it.
FIRE AND UTILITY HAZARDS (CONTINUED)
3.3.5 Gas Shutoff
When a gas meter is located inside the home:
If your gas meter is located inside your home, you should only shut off gas flow when instructed to by local authorities. If you smell gas or see the dials on your meter showing gas is flowing even though appliances are turned off, you should evacuate the premises and call 911. Do not attempt to shut off the gas from inside the building if gas may be in the air.
When a gas meter is located outside the home:
You should turn off the meter from outside the building if you smell gas or you see dials on the meter showing gas is flowing even though appliances are turned off. If there is a fire that you cannot extinguish, call 911 and turn off the gas only if it is safe to do so.
If you are unsure of the proper procedures, do not attempt to turn the utilities on again yourself, particularly in multiple-unit dwellings. Always follow your local fire department’s guidelines. Remember that, in all cases, natural gas that has been shut off can only be restored by a trained technician.
Again, some gas meters have automatic shutoff valves that restrict the flow of gas during an earthquake or other emergency. These are installed by a licensed plumber, downstream of the utility point of delivery. If you are unsure whether your home has this shutoff device, contact your gas service company. If this shutoff device is closed, only a qualified professional should restore it.
Never enter the basement of a structure that is on fire to turn off any utility.
Be sure to use a flashlight, not a candle, if an additional light source is needed to locate and shut off the gas valve.
3.3.6 Flammable Liquid Hazards
Here are several examples for reducing hazards from flammable liquids:
- Read labels to identify flammable products.
- Store them properly, using the L.I.E.S. method (Limit, Isolate, Eliminate, Separate). You should only extinguish a flammable liquid using a portable fire extinguisher rated for Class B fires.
3.4 SIZE UP
Size up is a continual process that enables professional responders to make decisions and respond appropriately in the areas of greatest need. Size up consists of 9 steps and should be used in every emergency situation.
3.4.1 NERT Size Up Steps
- Gather facts. What has happened? How many people appear to be involved? What is the current situation?
- Assess and communicate the damage. Try to determine what has happened, what is happening now, and how bad things can really get.
- Consider probabilities. What is likely to happen? What could happen through cascading events?
- Assess your own situation. Are you in immediate danger? Have you been trained to handle the situation? Do you have the equipment that you need?
- Establish priorities. Are lives at risk? Can you help? Remember, life safety is the priority!
- Make decisions. Base your decisions on the answers to Steps 1 through 5 and in accordance with the priorities that you established.
- Develop a plan of action. Develop a plan that will help you accomplish your priorities.
Simple plans may be verbal, but more complex plans should always be written.
- Act. Execute your plan, documenting deviations and status changes so that you can report the situation accurately to first responders.
- Evaluate progress. At intervals, evaluate your progress in accomplishing the objectives in the plan of action to determine what is working and what changes you may have to make to stabilize the situation.
NERT SIZEUP (CONTINUED)
3.4.2 NERT Fire Size Up
| Yes | No | |
| Step 1: Gather Facts | ||
| Time | ||
| Does the time of day or week affect fire suppression efforts? How? | 🞐 | 🞐 |
| Weather | ||
|
Are there weather conditions that affect your safety? If yes, how will your safety be affected? |
🞐 | 🞐 |
|
Will weather conditions affect the fire situation? If yes, how will the fire situation be affected? |
🞐 | 🞐 |
| Type of Construction | ||
| What type(s) of structure(s) are involved? | ||
| What type(s) of construction are involved | ||
| Occupancy | ||
|
Are the structures occupied? If yes, how many people are likely to be affected? |
🞐 | 🞐 |
| Are there special considerations (e.g., children, elderly, pets, people with disabilities)? | 🞐 | 🞐 |
| Yes | No | |
| Hazards | ||
| Are hazardous materials evident? | 🞐 | 🞐 |
|
Are any other types of hazards present? If yes, what other hazards? |
🞐 | 🞐 |
| Step 2: Assess and Communicate the Damage | ||
| Survey all sides of the building. Is the danger beyond your capability or training? | 🞐 | 🞐 |
| Have the facts and the initial damage assessment been communicated to the appropriate person(s)? | 🞐 | 🞐 |
| Step 3: Consider Probabilities | ||
| Life Hazards | ||
|
Are there potentially life-threatening hazards? If yes, what are the hazards? |
🞐 | 🞐 |
| Path of Fire | ||
|
Does the fire’s path jeopardize other areas? If yes, what other areas may be jeopardized? |
🞐 | 🞐 |
| Additional Damage | ||
|
Is there a high potential for more disaster activity that will impact personal safety? If yes, what are the known risks? |
🞐 | 🞐 |
| Yes | No | |
| Step 4: Assess Your Own Situation | ||
| What equipment is available to help suppress the fire? | ||
| What other resources are available? | ||
|
Can fire suppression be safely attempted by NERT volunteers? If not, do not attempt suppression. |
🞐 | 🞐 |
| Step 5: Establish Priorities | ||
|
Are there other, more pressing needs now? If yes, list. |
🞐 | 🞐 |
| Step 6: Make Decisions | ||
| Where will resources do the most good while maintaining an adequate margin of safety? | ||
| Step 7: Develop a Plan of Action | ||
| Determine how best to deploy personnel and resources. (Ref FEMA) | ||
| Step 8: Take Action | ||
| Put the plan into effect. | ||
| Step 9: Evaluate Progress | ||
|
Continually size up the situation to identify changes in the: Scope of the problem Safety risks Resource availability |
||
| Adjust strategies as required. | ||
3.5 FIRE SIZE UP CONSIDERATIONS
A size up of a situation involving a fire will dictate whether to attempt fire suppression and will help you plan for extinguishing the fire.
Size up is a continual 9-step process that enables you to make decisions and respond appropriately in the areas of greatest need. Evaluation of progress — Step 9 — may require you to go back and gather more facts.
Remember that the safety of individual NERT responders is always the top priority. Effective fire size up will allow you to answer all the following questions:
- Do my buddy and I have the right equipment?
- Are there other hazards?
- Is the building structurally damaged?
- Can my buddy and I escape?
- Can my buddy and I fight the fire safely?
3.5.1 Firefighting Resources
The most common firefighting resources are:
- Portable fire extinguishers
- Interior wet standpipes
Other resources include confinement and “creative resources.”
Fire Extinguishers
Portable fire extinguishers are invaluable for putting out small fires. A well-prepared home or workplace will have at least two portable fire extinguishers.
The type of fuel that is burning will determine which resources to select to fight a fire.
Because portable fire extinguishers are most common, this section will focus on them.
3.5.1.1 Types of Fire Extinguishers
There are four types of extinguishers:
- Water
- Dry chemical
- Carbon dioxide
- Specialized fire extinguishers
Fire Types, Extinguishing Agents, and MethodsFire Types, Extinguishing Agents, and Methods
|
FIRE TYPE |
EXTINGUISHING AGENT |
EXTINGUISHING METHOD |
|
Ordinary Solid Materials A |
Water Foam Dry chemical |
Removes heat Removes oxygen and heat Breaks chain reaction |
|
Flammable Liquids B |
Foam CO2 Dry chemical |
Removes oxygen Removes oxygen Breaks chain reaction |
|
Electrical Equipment C |
CO2 Dry chemical |
Removes oxygen Breaks chain reaction |
|
Combustible Metals D |
Special agents | Usually removes oxygen |
|
Kitchen Oils K |
Chemical | Usually removes oxygen |
FIREFIGHTING RESOURCES (CONTINUED)
3.5.1.2 Extinguisher Rating & Labeling
Portable fire extinguishers must be rated and approved by the State fire marshal and Underwriters Laboratories (an organization that sets safety standards for manufactured goods). They are rated according to their effectiveness on the different classes of fire. Their strength and capability must also be labeled by the manufacturer.
The label contains vital information about the type(s) of fire for which the extinguisher is appropriate.
Extinguishers that are appropriate for Class A fires have a rating from 1A to 40A, with a higher number indicating a higher volume of extinguishing agent.
Extinguishers that are appropriate for Class B fires have a rating from 1B to 640B. No number accompanies an extinguisher rated Class C, D, or K.
The C on the label indicates only that the extinguisher is safe to use on electrical fires.
Extinguishers for Class D fires must match the type of metal that is burning and are labeled with a list detailing the metals that match the unit’s extinguishing agent. These extinguishers also do not use numerical ratings.
Extinguishers for Class K fires are designed to supplement fire suppression systems in commercial kitchens. They spray an alkaline mixture that, when combined with the fatty acid of the burning cooking oil or fat, creates soapy foam to hold in the vapors and extinguish the fire.
MANUFACTURER’S LABEL ILLUSTRATION
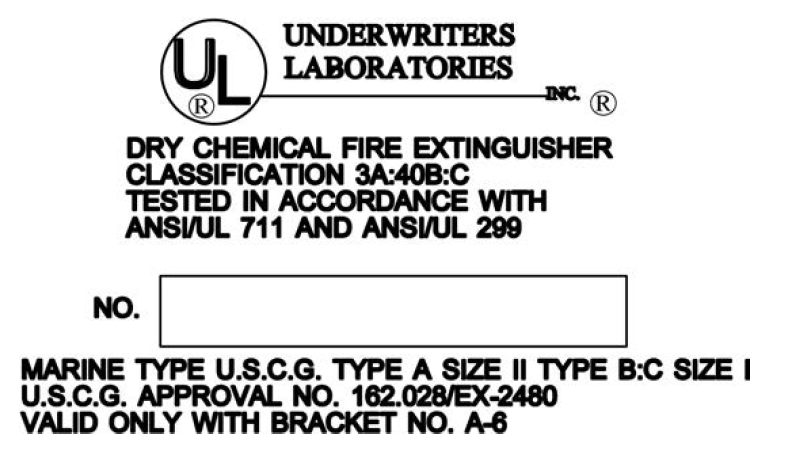
Sample manufacturer’s label for a fire extinguisher, showing the Underwriters Laboratories symbol at the top, the type and classification of fire extinguisher, testing procedures used, and serial number. At the bottom of the label is marine information, including the U.S. Coast Guard approval number.
FIREFIGHTING RESOURCES (CONTINUED)
3.5.1.3 Water Extinguishers
Common characteristics of water extinguishers include:
- Capacity. Standard size is 2.5 gallons.
- Range. Standard range is 30-40 feet.
- Pressure. Standard pressure is 110 pounds per square inch (psi).
Use caution so the water spray won’t scatter the burning material and spread the fire.
3.5.1.4 Chemical Extinguishers
Dry chemical extinguishers are most common.
- Sodium Bicarbonate base are effective on Class B and C fires.
- Monoammonium Phosphate base are effective for Class A, B, and C fires.
Common characteristics of dry chemical extinguishers include:
- Capacity. Approximately 10-20 seconds discharge time
- Range. Standard range is 8-12 feet.
- Pressure. Standard pressure is 175-250 psi.
Carbon dioxide and other specialized extinguishers are becoming less common.
3.5.1.5 Deciding To Use a Fire Extinguisher
Questions to ask before attempting to fight a fire with an extinguisher:
- Are there two ways to exit the area quickly and safely if I attempt to extinguish the fire? (The priority for you and your buddy is safety.)
- Do I have the right type of extinguisher for the type of fire?
- Is the extinguisher large enough for the fire?
- Is the area free from other dangers, such as hazardous materials and falling debris?
If you answer “NO” to any questions or if you can’t put out the fire in 5 seconds using the extinguisher, you should:
- Leave the building immediately.
- Shut all doors as you leave to slow the spread of the fire.
If you answer “YES” to all these questions, you may attempt to extinguish the fire. Even if you answer “YES” to all the questions but feel unable to extinguish the fire, you should leave immediately. You should always remember the 5-second rule.
If the fire is extinguished in 5 seconds and the area is safe, you should stay and overhaul the fire. Overhauling is the process of searching a fire scene for hidden fire or sparks to prevent the fire from rekindling. Remember “cool, soak, and separate.
Deciding to Use a Fire Extinguisher
IMMEDIATELY! IMMEDIATELY!Can I escape quickly and safely from theNOLEAVELEAVE
area if I attempt to extinguish the fire and do
not succeed?
YES
Do I have the right type of extinguisher?NOLEAVE IMMEDIATELY!
YES
Is the extinguisher large enough for the fire?NOLEAVE IMMEDIATELY!
** YES**
Is the area free from other dangers such as hazardous materials and falling debris?
** YES**
START TO EXTINGUISH THE FIRE
** LEAVE**
NO IMMEDIATELY!
Is the fire extinguished in 5 seconds?NOLEAVE IMMEDIATELY!
YES
STAY AND OVERHAUL THE FIRE IF THE AREA IS SAFE
COMPONENTS OF A PORTABLE FIRE EXTINGUISHER
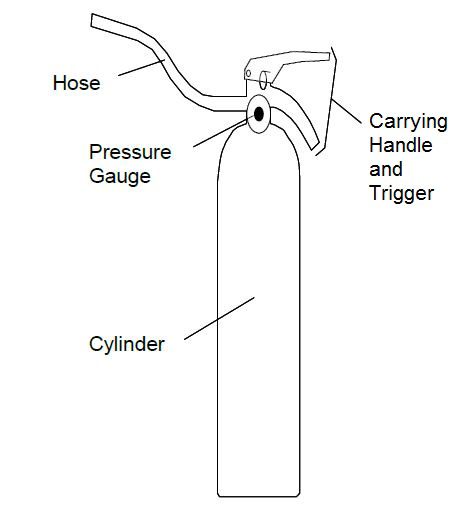
Components of a portable fire extinguisher: Hose, carrying handle and trigger, pressure gauge, cylinder
The acronym for operating a fire extinguisher is P.A.S.S.
- Pull (Test the extinguisher after pulling the pin)
- Aim
- Squeeze

- Sweep
PULL AIM SQUEEZESWEEP
FIREFIGHTING RESOURCES (CONTINUED)
To ensure that the extinguisher is working properly, test it before approaching any fire. Be sure to aim at the base of the fire. Any fire extinguishers that have been completely depleted should be laid down and stored on their side so no attempt will be made to use them until they are recharged.
3.5.1.6 Interior Wet Standpipes
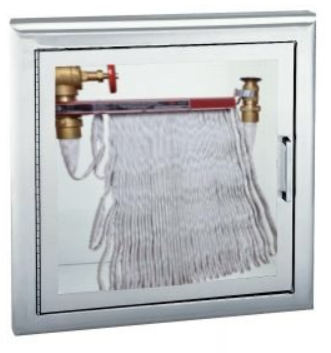
Interior wet standpipes are usually in commercial and apartment buildings and consist of 100 feet of 1.5-inch jacketed hose with an adjustable spray nozzle. They deliver up to 125 gallons of water per minute.
You will always need to work in two-person teams when using an interior wet standpipe.
Team Member 1: Removes the hose from the cabinet and make sure that hose is free of kinks and bends in the line. When ready, give the go-ahead to Team Member 2 to open the water valve.
Team Member 2: After Team Member 1 gives the go-ahead, open the water valve. Team Member 2 will then backup Team Member 1 at the nozzle.
Due to the dryness of the hose fabric, water may seep through the hose fabric until the hose is saturated. This may last for approximately 1 minute.
CONFINEMENT
In interior spaces, it is possible to confine a fire and restrict the spread of smoke and heat by closing doors, interior and exterior.
3.6 FIRE SUPPRESSION SAFETY
As a NERT responder, small fire suppression may be one of your roles. Your personal safety must always be your number one concern. You will be unable to help anyone if you are injured through careless size up or unsafe acts.
3.6.0.1 Fire Suppression Safety Rules
- Use safety equipment at all times. Wear your helmet, goggles, dust mask, leather gloves, and sturdy shoes or boots. If you are not equipped to protect your personal safety, leave the building.
- Work with a buddy. Buddies serve an important purpose. They protect your safety.
Don’t ever try to fight a fire alone.
- Have a backup team, whenever possible. A backup team just makes good sense. A backup team can support your fire suppression efforts and can provide help if you need it.
- Always have two ways to exit the fire area. Fires spread much faster than you might think. Always have a backup escape plan in case your main escape route becomes blocked.
- Look at the door. If air is being sucked under the door or smoke is coming out the top of the door, do not touch the door.
- Feel closed doors with the back of the hand, working from the bottom of the door up.
Do not touch the door handle before feeling the door. If the door is hot, there is fire behind it. Do not enter! Opening the door will add additional oxygen to the fire.
- Confine the fire, whenever possible, by closing doors and keeping them closed.
- Stay low to the ground. Smoke will naturally rise. Keeping low to the ground will provide you with fresher air to breathe.
- Maintain a safe distance. Remember the effective range of your fire extinguisher.
Don’t get closer than necessary to extinguish the fire.
- Never turn your back on a fire when backing out.
Overhaul the fire to make sure the fire is extinguished and that it will remain so.
Sometimes, what NERTs don’t do when suppressing fires is as important as what they should do. DON’T:
- Don’t get too close. Stay near the outer range of your extinguisher. If you feel the heat, you are too close.
- Don’t try to fight a fire alone. Remember that your first priority is your personal safety.
Don’t put it at risk.
- Don’t try to suppress large fires. Learn the capability of your equipment, and do not try to suppress a fire that is clearly too large for the equipment at hand (i.e., a fire that is larger than the combined ratings of available fire extinguishers).
- Don’t enter smoke-filled areas. Suppressing fires in smoke-filled areas requires equipment that NERTs don’t have.
3.6.0.2 Proper Fire Suppression Procedures
A buddy system is used in all cases.
- The job of Team Member 1 is to put out a fire with an extinguisher.
- The job of Team Member 2 is to watch for hazards and ensure the safety of both team members.
Here is the proper fire suppression procedure:
- Assume ready position. With the pin pulled, Team Member 1 holds the extinguisher aimed and upright, approximately 20 to 25 feet from the fire for small fires.
- When ready to approach the fire, Team Member 1 should say, “Ready.” Team Member 2 should repeat, “Ready.”
- As Team Member 1 begins to move forward, he or she should say, “Going in.” Team Member 2 should repeat the command and stay within reach of Team Member 1.
- Both team members should walk toward the fire. Team Member 1 should watch the fire and Team Member 2 should stay close to Team Member 1, keeping his or her hand on Team Member 1’s shoulder. Team Member 2’s job is to protect Team Member 1.
- When Team Member 1 is exiting the fire area, he or she should say, “Backing out.” Team Member 2 should repeat the command.
- Team Member 2 should guide Team Member 1 from the area with his or her hands as Team Member 1 continues facing the fire and looking for other hazards. Team Member 1 must never turn his or her back on the fire scene.
3.7 HAZARDOUS MATERIALS
Materials are considered hazardous if they have any of these characteristics:
- Corrode other materials
- Explode or are easily ignited
- React strongly with water
- Are unstable when exposed to heat or shock
- Are toxic to humans, animals, or the environment through absorption, inhalation, injection, or ingestion
3.7.0.1 Identifying Hazardous Materials Locations
Ways to identify locations where hazardous materials are stored, used, or in transit:
- Location and type of occupancy
- Placards
- Sights, sounds, and smells
3.7.1 Location and Type of Occupancy
Hazardous materials are commonplace throughout every community. They are used in many commercial processes and sold in many retail outlets. While these hazards are managed under normal circumstances, accidents and disasters can cause these materials to be released into the environment. Common locations in the community:
- Industrial locations (e.g., warehouse, rail yard, shipyard)
- Dry cleaner
- Funeral home
- Home supply store
- Big box store
- Delivery van (UPS, FedEx)
3.7.1.1 HAZARDOUS MATERIALS (CONTINUED)
Placards
The National Fire Protection Association (NFPA) 704 Diamond is a concise system for identifying the hazards associated with specific materials. The NFPA 704 Diamond placard is found on fixed facilities where hazardous materials are used or stored.
The diamond is divided into four colored quadrants, each with a rating number inside of it, which indicates the degree of risk associated with the material. Numbers range from 1 to 4. The higher the number the higher the risk!
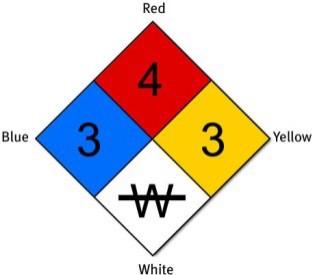
- The upper red quadrant describes the material’s flammability.
- The left blue quadrant indicates health hazard.
- The right yellow quadrant indicates reactivity.
- The lower white quadrant indicates special precautions.
There are two symbols specified in the National Fire Codes, section 704.
- W indicates a material that displays unusual reactivity with water (i.e., should never be mixed with water or have water sprayed on it).** Lithium-Ion batteries for electric bikes and scooters are an example of a material that is reactive to water.**
- OX indicates a material that possesses oxidizing properties. Ammonium nitrate is an example of a material with oxidizing properties. Materials that are oxidizers increase the potential for explosions or fire.
HAZARDOUS MATERIALS (CONTINUED)
In addition to the above symbols that are specified under the National Fire Codes, some NFPA 704 Diamonds will include additional symbols:
- ACID indicates that the material is an acid.
- ALK indicates that the material is a base.
- COR indicates that the material is corrosive.

▪ indicates that the material is radioactive.
The numbers within the NFPA 704 Diamond are used to assist professional firefighters in responding to accidents or fires.
NERT responders should consider these placards a “stop sign.” The only action NERT responders should take is to evacuate persons who are downwind, as necessary, to an uphill or upwind location. Do not enter the building to evacuate people inside.
3.7.1.2 Identifying Hazardous Materials in Transit
There are three ways that hazardous materials are marked and identified while in transit:
- The Department of Transportation (DOT) placard
- The United Nations (UN) system
- The North American (NA) warning placards
These placards can be on any vehicle, not only tankers. Keep in mind that:
- No placard is required for less than 1,000 pounds of many hazardous materials.
- Certain hazardous materials (e.g., anhydrous ammonia) are placarded as a nonflammable gas for domestic transport but as a flammable gas for international transport. (Anhydrous ammonia is a flammable gas!)
Sometimes drivers forget to change the placard when they change their cargo. Use extreme caution when approaching any vehicle in an accident.
HAZARDOUS MATERIALS (CONTINUED)
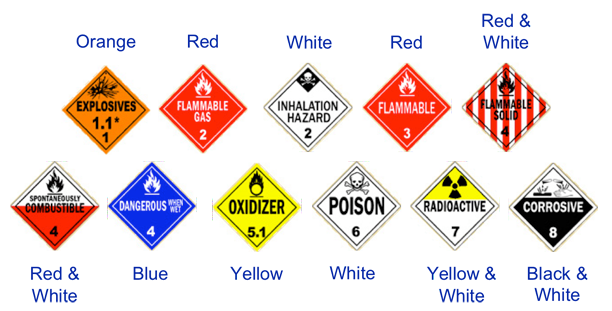
Like the NFPA 704 Diamond, the DOT, UN, and NA placards should be a “stop sign” for NERT members. You should always err on the side of safety. You should not assume that, because there is no placard, no hazardous materials are present. Treat any unknown situation as a hazardous materials incident.
DOT PLACARD WARNING
3.7.1.3 Sights, Sounds, and Smells
Hazardous materials are all around us and may be present regardless of the location or whether there are placards or other posted warnings. While hazardous materials often smell, sound, or look unusual, you may not be able recognize something toxic. You should stay away from any unidentifiable substance and alert building managers or authorities.
Chapter 2 Summary
Effective fire suppression depends on an understanding of:
- The elements required for fire to exist
- The type of fuel involved
- The class of fire
- The resources required and available to extinguish each type of fire
- Effective fire suppression techniques
Fire requires heat, fuel, and oxygen to exist.
There are five types, or classes, of fire:
- Class A: Ordinary combustibles
- Class B: Flammable liquids
- Class C: Energized electrical equipment
- Class D: Combustible metals
- Class K: Cooking oils in commercial kitchens and cafeterias
It is extremely important to identify the class of fire to use the proper extinguisher for the class.
Portable fire extinguishers are most frequently used for suppressing small fires.
Fire extinguisher labels tell the types of fires for which they are effective and the area that they can suppress.
When using portable fire extinguishers, remember P.A.S.S.: Pull, Aim, Squeeze, and Sweep. Always test the extinguisher after pulling the pin.
When suppressing a fire, always follow the safety rules established for NERTs.
To help understand the types of materials, there are several methods of placarding hazardous materials being stored or transported, including NFPA, DOT, UN, and NA.
When faced with accidents involving materials that are placarded as hazardous — or when the material is unknown — keep away and let professionals handle the situation.
HOMEWORK ASSIGNMENT
Before the Class 3, you should:
- Read and familiarize yourself with Chapter 3: Disaster Medical Operations — Part I and Chapter 4: Disaster Medical Operations – Part II in the Participant Manual.
Be sure to wear comfortable clothes for the next session because you will be practicing medical techniques